August 31, 2015

eLearning - Upcoming Revit, Infrastructure, and Ideate Software Classes

Join the Ideate Tech Experts for eLearning – live online classes that provide your entire organization with easy access to premium education.
9.1::Revit 201:
Project Setup for Revit MEP
9.3::Ideate Software:
Auditing Your Revit Project with Ideate Explorer
9.11::Infrastructure 201:
Section Sheets and Code Set Styles
9.15::Revit 201:
Revit MEP and Low Voltage Systems
9.16::Ideate Software:
Ideate BIMLink for Revit MEP Projects
9.17::Ideate Software: 
Introduction to Ideate Sticky
9.18::Revit 201:
Revit for Interior Designers
10.1::Ideate Software:
Revit Model Management with Ideate BIMLink
Each class is designed to give you specific, improved results in a particular topic. You can interact with the instructor right from your own office, while eliminating travel time. Because the class schedule rotates, you can easily select your topics of interest and choose the day which best meets your schedule.

Click here for class descriptions, times and registration link. Questions? Contact education@ideateinc.com

Get It. Know It. Use It.

Classroom Training - Open AutoCAD, Revit and Navisworks Classes

Know It. Ideate Training.

Position yourself to land dream projects. Tap the full potential of your software solutions. Increase your facility, fluidity and capability to maximize the value of your precision software tools.
9.10-9.11::San Francisco
Navisworks Fundamentals
9.15-9.17::Portland
Revit Architecture Fundamentals
9.15-9.17::Seattle
Revit Architecture Fundamentals
9.21-9.22::San Francisco
Revit MEP - Mechanical Fundamentals
9.22-9.24::Seattle
AutoCAD Fundamentals
9.29-10.1:San Jose
Civil 3D Fundamentals
Know your software. Sign up now! 

Contact the Ideate Training Department at 888.662.7238 x1012 or education@ideateinc.com

August 27, 2015

AutoCAD 2016 Dimension Tool Enhancements


At Ideate, we’ve been going through the updates to the AutoCAD 2016 release.  In this post, I will describe the enhancements made to dimensioning.

Predictive Dimension Command

The dimension tool is now easier to use with its new predictive capabilities.  As opposed to choosing the type of dimension you need, the dimension command now predicts what type of dimension to place by hovering over the object that you want to dimension. This new dimension command can be found in the same place as the old one on the Annotate tab of the ribbon.  The new dimension command replaces the dimension drop down list that exists in previous versions of AutoCAD. 


Image: The annotate tab with the new predictive dimension tool
To use the new dimension command, select it from the annotate tab or type DIM in the command line and hover over the object you want to dimension.  Options for dimensions show up in the command line.  For example, if you start the dimension command and hover over a circle, the command line shows you options for dimensioning a circle.  If you want to draw an angular dimension, select one of the objects going to be used for the dimension.  Then select the next object that is an edge of the angle.

Dimension Editing Additions

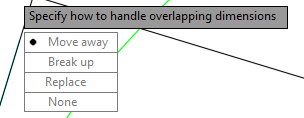
Another improvement to dimensioning functionality is the ability for AutoCAD to recognize when you are placing a dimension on top of an already existing dimension.  The software allows for 4 options when this occurs: move away, break up, replace and none.  
 
 
Let’s explore these options. The first picture shows the original dimension.  In the subsequent images, I am placing the same dimension on top of the existing dimension.  However, for each image I use one of the different options: move away, break up, replace or none.  


Image: Original dimension before a second dimension is placed on top


Image: Option 1 Move away
 

Image: Option 2 Break up

Image: Option 3 Replace

Image: Option 4 none
In short, the new updated dimension tool
• Predicts the type of object that is being dimensioned
• Changes the options for dimensioning depending on the object type
• Allows for options when placing a dimension on top of an already existing dimension


For more information on training and consulting for the various products Ideate services, visit our website at
www.ideateinc.com


Kate Ming

Ideate AEC Application Specialist

Kate is a California licensed civil engineer with a BS in Civil and Environmental Engineering from UC Berkeley. Prior to Ideate, she worked at a multinational company for four years doing general civil design on large infrastructure projects. She is versed in roadway, rail, utility design and site development. She also has experience with utility demand analysis and Low Impact Development plans. As a Civil 3D Autodesk Certified Professional Kate provides training and support for Civil 3D, AutoCAD, and InfraWorks.

August 25, 2015

What’s New in Civil 3D 2016: The Easiest Way to Import a Bridge Model from InfraWorks into Civil 3D


There has never been a greater need to exchange 3D model info between InfraWorks and Civil 3D. And there has never been an easier way to do that before. Before Civil 3D 2016 that is!

Yes with Civil 3D 2016 you can now import terrain, design roads, intersections, bridges, et al from InfraWorks.

All you have to do is invoke the command Insert > Infraworks 360 > Open InfraWorks model


And voila, Civil 3D alignment, existing terrain as a Civil 3D surface and bridges as solids show up in the model.


The profile with the bridges displays once I project both the bridges to the profile view. The profile view below is displayed in the model with Conceptual visual style.
 
 
How I ran this command successfully:

1. Set the command InfraWorks 360 Object defaults to only import design roads (alignments). I saved it as an external XML file.


2. Then Import the alignment only at first – obviously for performance.


3. Then run the command again and this time import only the existing ground. Make sure to pick a Selection Area near your project to import relevant area of the existing terrain.


...View video below...
 

For more information on training and consulting for the various products Ideate services, visit our website at www.ideateinc.com


Gaurav Bagga

Ideate ACI-Senior Application Specialist Infrastructure

Gaurav is a Senior Application Specialist for Infrastructure Solutions at Ideate based out of San Francisco. He has over 18 years of experience in construction and related software
industry. With this extensive design technology background he helps engineering and surveying companies, federal and state government agencies, and ENR 500 firms critically analyze and improve their construction drawing production process. He implements Civil infrastructure design technology led by InfraWorks and Civil 3D and has helped Ideate grow Civil Infrastructure Services. Being an industry recognized speaker he has presented cutting edge design technology at several industry conferences such as Autodesk University. @BeGeez

Get it. Know it. Use it.

August 24, 2015

eLearning - Upcoming Revit, Navisworks, Infrastructure, and Ideate Software Classes

Join the Ideate Tech Experts for eLearning – live online classes that provide your entire organization with easy access to premium education.
8.26::Revit 201:
Leveraging Design Options
8.27::Ideate Software:
Introduction to
Ideate Sticky
8.28::Navisworks 101:
Introduction to Navisworks Manage
9.1::Revit 201:
Project Setup for Revit MEP
9.3::Ideate Software:
Revit Auditing with Ideate Explorer for Revit
9.11::Infrastructure 201: 
Section Sheets and Code Set Styles
9.15::Revit 201:
Revit MEP and Low Voltage Systems
9.16::Ideate Software:
Ideate BIMLink for Revit MEP Projects
Each class is designed to give you specific, improved results in a particular topic. You can interact with the instructor right from your own office, while eliminating travel time. Because the class schedule rotates, you can easily select your topics of interest and choose the day which best meets your schedule.

Click here for class descriptions, times and registration link. Questions? Contact education@ideateinc.com

Get It. Know It. Use It.

Classroom Training - Open Revit, Navisworks and AutoCAD Classes

Know It. Ideate Training.

Position yourself to land dream projects. Tap the full potential of your software solutions. Increase your facility, fluidity and capability to maximize the value of your precision software tools.
9.1-9.2::San Francisco
Revit Architecture Beyond the Basics
9.1-9.2::San Francisco
Revit MEP - Electrical Fundamentals
9.10-9.11::San Francisco
Navisworks Fundamentals
9.15-9.17::Portland
Revit Architecture Fundamentals
9.15-9.17::Seattle
Revit Architecture Fundamentals
9.22-9.24:Seattle
AutoCAD Fundamentals
Know your software. Sign up now! 

Contact the Ideate Training Department at 888.662.7238 x1012 or education@ideateinc.com

August 21, 2015

Revit MEP 2016 Pipe Layout for Fabrication


Autodesk Revit 2016 Revit now allows you to add fabrication level detail to pipe systems using content from Autodesk Fabrication products.

Procured parts, such as pipe fittings are constrained to realistic dimensions based on their content definitions known as product listed parts, and represent components that may be purchased.

When you add a coupling like a flange at the end of a pipe for a welded pipe system, Revit MEP 2016 will automatically add another flange when you add a fitting like an elbow.

Flanges are automatically added when a flanged valve is inserted.  When adding a pipe to the valve, a flange will be added to the end to properly connect to the valve.

Use Revit tools like copy to quickly and easily add similar components with the ability to rotate them upon placement or after.  After placing a straight segment, you can use the Properties palette to change the length of pipe. 

The fabrication content also includes hangers for pipe that will automatically size and extend to supporting elements to linked models.  When used the hangers extend to the beam in the linked structural model.  Adjusting the pipe elevation will automatically adjust the rod length.

 
...View video below...


For more information on training and consulting for the various products Ideate services, visit our website at www.ideateinc.com


Bill Johnson

Ideate Senior Application Specialist MEP/AEC Solutions

Bill has over 25 years experience in applying MEP & AEC design solutions for large commercial companies, this has led to actively develop Autodesk® Revit® implementation strategies, techniques, and procedures for architectural and MEP companies. He has worked for TEECOM Design Group, GTE/GTEL, Greg LeDoux and Associates, and Scottish Power in England. Bill is an Autodesk MEP Implementation Certified Expert, and has been the Lead Designer for several multimillion dollar communication sites which have included structural, electrical, HVAC, conduit, cable plans and equipment layouts. He graduated from the Pasadena Institute of Technology and has a Sustainable Design Certification from the University of California at Berkeley.

Get it. Know it. Use it.

August 20, 2015

Keys to a Successful BIM Pilot Series: Featuring BIM Manager Laura Kay Smith


Having a hard time getting your office to adopt, or effectively work with BIM? Let Laura Kay Smith (AKA, The BIM Freak) show you some of the ways she discovered to promote BIM in her office.

Date: Thursday August 27th, 2015
Time: From 11:00 am to 12:00 pm (Pacific Standard Time)


For more information on training and consulting for the various products Ideate services, visit our website at www.ideateinc.com

August 19, 2015

BIM Co-ordination – AutoCAD and Navisworks


AutoCAD 2016 now has the option of referencing Navisworks cache (NWC) files or document (NWD) files.

A designer can reference these files from within AutoCAD and so “draw in context”. This promotes clash avoidance and promotes better co-ordination between the building trades. When the AutoCAD file is appended to the Navisworks model, it would be co-ordinated and be correctly located within the model.

This both simplifies the co-ordination process and lets the AutoCAD user see the relevant NWC or NWD file change as the aggregated model is updated.

 
...View video below...
 

For more information on training and consulting for the various products Ideate services, visit our website at www.ideateinc.com


Jim Cowan

Ideate AEC Senior Application Specialist

Jim Cowan’s extensive AEC design industry experience, Autodesk design solutions expertise and status as an Autodesk Certified Instructor have made him a sought after university curriculum developer, instructor and presenter. Jim’s areas of expertise include eLearning, interoperability between solutions and overcoming barriers to the adoption of Building Information Modeling (BIM). Educated in Architecture at Edinburgh College of Art/Heriot–Watt University and in Landscape Architecture at University of Manitoba, Jim has special focus on sustainability issues: daylight analysis, sun studies, lighting analysis, modeling buildings and conceptual energy modeling (models with shading devices). YouTube Channel: MrJimCowan

Get it. Know it. Use it.

August 17, 2015

eLearning - Upcoming Revit, Navisworks, Infrastructure, and Ideate Software

Join the Ideate Tech Experts for eLearning – live online classes that provide your entire organization with easy access to premium education.
8.18::Revit 201:
Getting Started with Daylighting Studies in Revit and 3ds Max Design
8.20::Ideate Software:
Revit Project Management with Ideate BIMLink
8.21::Infrastructure 201:
Analysis for Master Planning
8.26::Revit 201:
Design Options
8.27::Ideate Software:
Introduction to Ideate Sticky
8.28::Navisworks 101: 
Introduction to Navisworks Manage
9.3::Ideate Software:
Revit Auditing with Ideate Explorer for Revit
Each class is designed to give you specific, improved results in a particular topic. You can interact with the instructor right from your own office, while eliminating travel time. Because the class schedule rotates, you can easily select your topics of interest and choose the day which best meets your schedule.

Click here for class descriptions, times and registration link. Questions? Contact education@ideateinc.com

Get It. Know It. Use It.

Classroom Training - Open Revit Architecture, Revit MEP, and Navisworks Classes

Know It. Ideate Training.

Position yourself to land dream projects. Tap the full potential of your software solutions. Increase your facility, fluidity and capability to maximize the value of your precision software tools.
8.25-8.27::San Francisco
Revit Architecture Fundamentals
8.31-9.1::Portland
Revit Architecture Beyond the Basics
9.1-9.2::San Francisco
Revit MEP Electrical Fundamentals
9.1-9.2::San Francisco
Revit Architecture Beyond the Basics
9.10-9.11::San Francisco
Navisworks Fundamentals
Know your software. Sign up now! 

Contact the Ideate Training Department at 888.662.7238 x1012 or education@ideateinc.com

Four Hidden Surface Commands You Must Know in Civil 3D 2016


While you may have been using Civil 3D for quite some time it’s possible that you may have missed some of these time saving commands. In particular there is a new one in Civil 3D 2016.


Well, they are not so hidden, it is easy to miss them without paying close attention! They are all situated within the Tin surface contextual tab of Civil 3D 2016 as shown above.

Create cropped surface lets you create a small cropped surface from a large surface that may have initially started out small but grew as the project size grew.

Extract Solids is a command new in Civil 3D 2016 and lets you create an AutoCAD 3D solid object from a surface object.


The picture below shows the Civil 3D surface in plan view to the left and the 3D solid extracted in 3D view to the right.
 
  
Extract Objects lets you extract surface components such as border, contours etc. from a surface as AutoCAD entities such as creating polylines from surface contours. The figure below shows the extract objects dialog box for a surface that displays all its components.
 
 
Export to DEM creates a DEM file from the Civil 3D surface object that can be used in other applications, typically GIS, that use DEMs.


For more information on training and consulting for the various products Ideate services, visit our website at www.ideateinc.com


Gaurav Bagga

Ideate ACI-Senior Application Specialist Infrastructure

Gaurav is a Senior Application Specialist for Infrastructure Solutions at Ideate based out of San Francisco. He has over 18 years of experience in construction and related software
industry. With this extensive design technology background he helps engineering and surveying companies, federal and state government agencies, and ENR 500 firms critically analyze and improve their construction drawing production process. He implements Civil infrastructure design technology led by InfraWorks and Civil 3D and has helped Ideate grow Civil Infrastructure Services. Being an industry recognized speaker he has presented cutting edge design technology at several industry conferences such as Autodesk University. @BeGeez

Get it. Know it. Use it.

August 14, 2015

Part 2 - The 124th Avenue Extension Project: Challenges to Overcome


With part of the 124th Avenue Extension going through the middle of an existing rock quarry, the roadway will have significant elevation changes requiring numerous rock cuts, walls, and re-grading of adjacent property driveways. In this second webcast in the series, Dan Lliyn shares DEA's experience moving to BIM as they attempt to overcome some of these project design challenges. Dan will focus on the project roadblocks they ran into and how these were resolved thorough Autodesk solutions and InfraWorks. He will touch on starting the project with Bentley's MicroStation / InRoads and translating that into InfraWorks. Dan will then setup the 3rd and final webcast in the series by highlighting some of the benefits of this process to enable smoother preliminary design, visualization to design workflows.

Date: Thursday August 20, 2015
Time: From 10:00 am to 11:00 am (Pacific Standard Time)


For more information on training and consulting for the various products Ideate services, visit our website at www.ideateinc.com

August 13, 2015

Lean Construction Case Study: From Paper to Cloud

As a contractor, making the step to deploying Lean for your production planning process is a major undertaking. And once you have made the transition to leveraging the Last Planner methodology to manage the tasks, commitments and dependencies during your planning meetings, you need an efficient way to capture, manage, visualize and collaborate against the data you collect. While spreadsheets and sticky notes are the current standard, cloud and mobile technology like BIM 360 Plan reduce the manual data entry process while automatically collecting and articulating productivity reports for process improvement.

Join us to learn how Autodesk BIM 360 Plan can help you better manage the production planning process by:

• Exposing critical short-term planning data to the entire project team

• Adding/updating tasks, dependencies and roadblocks in-real time and sharing with mobile users

• Reviewing PPC reporting metrics in aggregate to drive change and process improvements or future projects
 

Date: Thursday August 20, 2015
Time: From 8:00 am to 9:00 am (Pacific Standard Time)


For more information on training and consulting for the various products Ideate services, visit our website at www.ideateinc.com

August 12, 2015

Revit MEP 2016 Calculation Setting Options


In Revit MEP 2016, one of the new MEP Engineering Enhancements is a new calculation setting called Performance. This has been added to the Calculations drop down menu to improve performance while working with most duct and pipe systems. When the Calculations parameter is set to Performance, it suppresses the processing of system-level calculations with most duct and pipe systems. When it is set to None, the system still maintains the logical sections in the system.

To improve performance while working with large Fire Protection, Vent, and Other classification system types, a new setting, Volume Only, has been added to the Calculations drop-down. When the Calculations parameter is set to None, the Volume parameter is not computed. When the Calculations parameter is set to Volume Only, the Volume parameter is calculated. Upgraded projects will have the Calculations parameter set to Volume Only for existing systems in which the Calculations parameter was set to None.

These new settings will help you improve model performance when working with large projects.


For more information on training and consulting for the various products Ideate services, visit our website at www.ideateinc.com


Vasudha Dixit 

Ideate MEP Application Specialist

Vasudha is an MEP Application Specialist at Ideate, Inc. based on San Francisco office. She has a Master’s degree in Energy Engineering from the University of Illinois at Chicago where she specialized in HVAC design, green buildings and energy analysis. Prior to Ideate, she interned at a few multinational companies where she performed finite element analysis for design validation of components. Vasudha provides Revit MEP training and support for various AEC firms.

August 11, 2015

Autodesk Revit 2016 Selection Box


A new feature in Revit 2016 give the user the ability to create 3D isometric views from selected model elements.

In order to accomplish this task in previous versions of Revit user would have to create a 3D view and check on the views Section Box option from the Properties Palette then adjust the section box to the desired element(s) location.  Or users could use an existing view or create a view of the element(s) area and use the Orient to View option from the ViewCube right-click menu.

To create 3D isometric view use the Selection Box tool users simply select the element(s) they would like to isolate in a 3D isometric view and then select the Selection Box tool from the View panel on the Ribbon.  Revit will open the Default 3D View with a section box around the element(s) from your selection set.  To save the view for future use the user merely needs to right-click on the ViewCube and select the Save View option from the menu and enter an appropriate view name.

This new feature enables the use to quickly isolate selected elements in an unobstructed 3D view and to efficiently document a model. Helping project teams to better communicate within their project with smarter modeling and documentation views.


...View video below...


For more information on training and consulting for the various products Ideate services, visit our website at www.ideateinc.com


Eugene A. O'Day 
Ideate AEC Senior Application Specialist

Eugene A. O’Day, IX, with more than 25 years of architectural and mechanical experience, offers a trained focus on all things Revit and BIM. Teaching is a passion of his. Eugene has been an instructor in undergraduate degree programs, has traveled worldwide teaching Autodesk solutions to major corporations, has taught at accredited ATCs throughout the Northwestern region, and is a frequent and popular instructor, speaker, and presenter for AUGI® CAD Camps, Revit – and related product user groups. He has also been a trusted public school district advisor on new drafting instructor hires. At Ideate, Eugene provides training and support for Revit Architecture, Revit Structure and AutoCAD. Eugene is also a Revit Architecture Autodesk Certified Professional.

Get it. Know it. Use it.

August 10, 2015

eLearning - Upcoming Revit, AutoCAD, and Ideate Software Classes

Join the Ideate Tech Experts for eLearning – live online classes that provide your entire organization with easy access to premium education.
8.13::Revit 201:
Working With Wall Types in Revit Architecture
8.14::Infrastructure 201:
Settings and Styles
8.18::Revit 201:
Getting Started with Daylighting Studies in Revit and 3ds Max Design

8.20::Ideate Software:
Revit Project Management with Ideate BIMLink
8.21::Infrastructure 201:
Analysis for Master Planning
8.26::Revit 201:
Design Options
8.27::Revit 201:
Introduction to Ideate Sticky
9.3::Ideate Software:
Revit Auditing with Ideate Explorer for Revit
Each class is designed to give you specific, improved results in a particular topic. You can interact with the instructor right from your own office, while eliminating travel time. Because the class schedule rotates, you can easily select your topics of interest and choose the day which best meets your schedule.

Click here for class descriptions, times and registration link. Questions? Contact education@ideateinc.com

Get It. Know It. Use It.

Classroom Training - Open Revit Architecture and Revit MEP Classes

Know It. Ideate Training.

Position yourself to land dream projects. Tap the full potential of your software solutions. Increase your facility, fluidity and capability to maximize the value of your precision software tools.
8.19-8.20::Portland
Revit Architecture Fundamentals
8.18-8.19::Sacramento
Revit MEP Electrical Fundamentals
8.25-8.27::San Francisco
Revit Architecture Fundamentals
8.31-9.1::Sacramento
Revit Architecture Beyond the Basics
9.1-9.2::Seattle
Revit Architecture Beyond the Basics
9.1-9.2::San Francisco
Revit MEP Electrical Fundamentals
Know your software. Sign up now!
Contact the Ideate Training Department at 888.662.7238 x1012 or education@ideateinc.com

August 6, 2015

Revit MEP 2016 – Part Optimization for Fabrication


Autodesk Revit 2016 uses the Autodesk Fabrication MEP configuration data defined in the *.ITM template parts in the current version of Autodesk Fabrication products CADmep and ESTmep.

The Duct Part Editor enables you more detailed control over the duct components and allows you to define detailed dimensions of the part and its connectors.

When placing fabrication parts in Revit 2016, the specifications defined in the Fabrication Configuration define what duct materials may be used.


The specification also controls material gauge (weight), the standard segment lengths, and the connectors applied to the fitting ends.

The *.ITM Template based parts enable detailed control of dimensional values.  The connector settings provide you with the ability to configure end conditions.

 
...View Video Below...


For more information on training and consulting for the various products Ideate services, visit our website at www.ideateinc.com


Bill Johnson

Ideate Senior Application Specialist MEP/AEC Solutions

Bill has over 25 years experience in applying MEP & AEC design solutions for large commercial companies, this has led to actively develop Autodesk® Revit® implementation strategies, techniques, and procedures for architectural and MEP companies. He has worked for TEECOM Design Group, GTE/GTEL, Greg LeDoux and Associates, and Scottish Power in England. Bill is an Autodesk MEP Implementation Certified Expert, and has been the Lead Designer for several multimillion dollar communication sites which have included structural, electrical, HVAC, conduit, cable plans and equipment layouts. He graduated from the Pasadena Institute of Technology and has a Sustainable Design Certification from the University of California at Berkeley.

Get it. Know it. Use it.


August 5, 2015

The New Flavors of Autodesk InfraWorks 360


As the ENI Team Lead and a Senior Application Specialist at Ideate, Inc.  Autodesk InfraWorks has been one of my primary applications for quite some time.  Over the years it has gone through a number of updates, enhancements and even changed its name (more than once).  In 2016, we have a new set of InfraWorks products, and here’s a little bit of information that may help clear things up. First, let’s start with product naming.  We are now down to just two options, which are:

Autodesk InfraWorks 360 and Autodesk InfraWorks 360 LT

Autodesk InfraWorks 360 LT replaces the Autodesk InfraWorks version that was previously included as a subscription entitlement with the Design Suites (Building Design Suite Ultimate or Infrastructure Design Suite Premium and Ultimate).  It is also available for purchase as a stand-alone product for non-Suite product owners.

Autodesk InfraWorks 360 is the “full” version of InfraWorks in 2016 and is a separate software purchase.  It includes additional functionality beyond what is included with the LT version, and can also be upgraded with additional modules for Road, Bridge and Drainage Design (requires additional purchase).

The second big change is the lack of a Serial Number with Autodesk InfraWorks 360 installations.  For owners of one of the above mentioned Design Suites, Autodesk InfraWorks 360 installs as a 30-day trial with the Suite.  This does not require a serial number, and activates the full version of the product for 30-days.  After the trial period is over, the installation reverts back to the LT version unless an upgrade to the full product version is purchased.

Now you might be thinking “If there’s no serial number, how do we know what we have?”

This is where your Autodesk 360 (A360) account comes in to play.  When a full seat of InfraWorks 360 is purchased, the software manager at your organization must assign the product entitlement to the end user that will be using the application.  This is done through A360, and must also be done with the additional modules that are available for purchase.  Once the product entitlement has been assigned to a user’s A360 account, logging in to A360 after launching the application enables (or disables) the features that the end user is entitled to.  It sounds like a complicating process, but this actually allows an end user to change computers, or go from a desktop to a laptop without having to worry about uninstalling and reinstalling the application.
An A360 account with no entitlements can log in to Autodesk InfraWorks on any workstation and the program will revert to the LT version where you can open and access models, but all other features have been disabled.


Autodesk InfraWorks 360 LT (login using A360 ID with no entitlements)
 

When an A360 ID with full entitlements is used at login (on the same installation), the application loads and enables all available features that have been assigned to that user. 
 
 
Autodesk InfraWorks 360 (login using A360 ID with full entitlements)

The full version of Autodesk InfraWorks 360 has significantly more features available, including the Model Builder, Groups, the ability to create new models from scratch, design Modules (Road, Bridge and Drainage) and a number of “preview only” features that have not yet been fully released.  Also included, but not shown are additional cloud-based optimization tools accessible through an A360 account with cloud credits.
 
A full comparison list of features in Autodesk InfraWorks 360 and InfraWorks 360 LT can be found below....


A So regardless of if you’re an existing user, new user or future user, now you know what options are available in the 2016 version of Autodesk InfraWorks 360.

For more information on training and consulting for the various products Ideate services, visit our website at www.ideateinc.com


Matt Miyamoto

Ideate ENI Manager & Senior Application Specialist

Matt is an ENI Manager and Senior Application Specialist in Ideate, Inc.’s Seattle office. He has a B.S. in Mechanical Engineering and is a licensed Civil Engineer. Prior to joining Ideate, Matt worked as a civil engineer, using Civil 3D on a variety of projects including site development, roadway improvements and infrastructure design. With over 10 years of experience in the civil engineering industry, Matt now provides training, consulting, technical support, and implementation strategies for organizations transitioning to Civil 3D. Matt is an Autodesk Certified Instructor (ACI), as well as an Autodesk Certified BIM Specialist: Roads and Highway Solutions. Additionally, Matt is and Autodesk Certified Professional for AutoCAD, and AutoCAD Civil 3D. He can be found on twitter as @MattM_PE
Get it. Know it. Use it.