Showing posts with label InfraWorks 360. Show all posts

February 7, 2017

Why InfraWorks 360 is Worth Paying For

The time you save is worth the price of subscription.

As the ENI Manager here at Ideate, I have been working to help sort out some of the software details that went into effect with the transition to Autodesk AEC Collections and the retiring of Design Suites at the end of 2016. One of the larger changes that came with this transition was the packaging and offerings associated with Autodesk InfraWorks 360. Some customers have been asking if they need to upgrade to a full version, or if InfraWorks 360 LT is sufficient, and how they might better justify the cost involved if InfraWorks 360 is right for them.

If you're in that group wondering what version you need, the following might help.

Some of biggest differences between the full version of InfraWorks 360 and the LT version, based on this feature comparison, are the cloud collaboration and the Road, Bridge, and Drainage design features. However, the one function that has been worth the cost of upgrading, in my opinion, is the item listed as "Automate Model Creation." It doesn't seem like much, but it's the one feature everyone will use, regardless of industry or design focus. Not all customers will need Road, Bridge, or Drainage design, and maybe you don't have immediate plans for cloud collaboration, but you can use Model Builder.

Model Builder, listed as "Automate Model Creation" in the PDF matrix, automatically finds, downloads, imports, and stylizes existing GIS data from the United States Geological Survey (USGS) and OpenStreetMaps to create a functioning model of the existing conditions. If you can search for a place online—think Bing or Google Maps—you can probably find it in Model Builder. Without Model Builder, even the most experienced GIS users may take a few hours to search for, find, and download the right data from their favorite sources. At that point, the data still needs to be imported and stylized manually.

With Model Builder, the entire process from finding data to importing and stylizing in InfraWorks 360 is automatic, and it usually completes in 15 minutes or less. There is a maximum download area of 200 sq.km, but models can be combined after they are created.

For more details on the difference between InfraWorks 360 LT and InfraWorks 360, read my post, Flavors of InfraWorks.

It seems worth noting that the full InfraWorks 360 subscription gives you access to periodic updates that are released throughout the year. If you're wondering what's new in the latest release (v2017.3 at the time this post was written), here's a great article from the Autodesk team.

For more information on purchasing InfraWorks 360, or if you have any questions, please contact sales@ideateinc.com, we are happy to help.

Thank you for reading. For more information on the software solutions, training, and consulting Ideate provides, visit our website at www.ideateinc.com.


ENI Manager & Senior Application Specialist
Matt is an ENI Manager and Senior Application Specialist in Ideate, Inc.’s Seattle office. He has a B.S. in Mechanical Engineering and is a licensed Civil Engineer. Prior to joining Ideate, Matt worked as a civil engineer, using Civil 3D on a variety of projects including site development, roadway improvements and infrastructure design. With over 10 years of experience in the civil engineering industry, Matt now provides training, consulting, technical support, and implementation strategies for organizations transitioning to Civil 3D. Matt is an Autodesk Certified Instructor (ACI), as well as an Autodesk Certified BIM Specialist: Roads and Highway Solutions. Additionally, Matt is and Autodesk Certified Professional for AutoCAD, and AutoCAD Civil 3D. He can be found on twitter as @MattM_PE

February 2, 2017

The Flavors of InfraWorks 360

During a recent round of customer visits, I was pleased to hear questions about Autodesk InfraWorks 360 and its features. Many of those questions revolved around what exactly our customers had access to, and what the differences between the available versions were.

Over the years, InfraWorks has seen a number of name changes, feature updates, additions, and modifications. And, unlike other Autodesk applications, the software is not on an annual rollout, meaning new features and functions are released throughout the year via periodic product updates.

Before I really get into it, though, here is some background information:

  1. InfraWorks 360 IS NOT a serial number based application.
  2. InfraWorks 360 IS a product entitlement assigned to an individual user's Autodesk account by the contract holder or software coordinator. 
  3. InfraWorks 360 can be installed on any 64-bit Windows 7, 8, 8.1, or 10 OS system without a serial number.
  4. A user's Autodesk Login activates the features and functions when the program is launched.
  5. Version updates are released periodically throughout the year, unlike the annual releases of other Autodesk products. The current version at the time of this post is 2017.3.
  6. User accounts and entitlements may not be shared per the license agreement.
Diving in, as of January 2017, you have two options for InfraWorks 360:

Option 1 - InfraWorks 360 LT 


Previously, the "LT" version of InfraWorks 360 was included as part of the now-retired Design Suites, and it has limited or “light” functionality compared to the full version of InfraWorks 360.

It should be noted that the LT version is no longer available for purchase, but can be accessed by customers who have an existing and active maintenance subscription for Autodesk® Infrastructure Design Suite Ultimate edition, Autodesk® Infrastructure Design Suite Premium edition, or Autodesk® Building Design Suite Ultimate editions.

This means if you are an existing customer with an active subscription for one of the older suites, you are entitled to InfraWorks 360 LT. If you are a current subscriber of the new AEC Collection, you have access to the full version of InfraWorks 360.

Option 2 - InfraWorks 360


This is currently available as an individual product subscription or as part of the AEC Industry Collection from Autodesk, and it includes access to all features and functions of the product.

As of the 2016 release of InfraWorks 360, the once “a la cart” Road, Bridge, and Drainage design modules are now included as part of InfraWorks 360, at no extra cost. Learn more about this change.

Here's a handy PDF, Autodesk InfraWorks 360 vs.Autodesk InfraWorks 360 LT Comparison Matrix, highlighting the differences between InfraWorks 360 LT and InfraWorks 360.


To find out what version of Infraworks 360 you’re currently running, launch the program and open one of your models.  Click on Settings and Utilities, then Application Options to access the About dialog.  The version you have is listed on the upper left corner of the About information.  If you are on subscription, you can download and install the latest version of Infraworks 360 through the Autodesk Desktop App.  Please note, Infraworks 360 models are version specific, so updating to the latest version will also prompt you to upgrade any existing models the next time they are opened.

There it is, now you've got a breakdown of the two remaining “flavors” of InfraWorks 360 and how (or why) you have access to a particular version. 

If you have LT and want more information on purchasing a full version of InfraWorks 360, please contact sales@ideateinc.com.

Thank you for reading. For more information on the software solutions, training, and consulting Ideate provides, visit our website at www.ideateinc.com.


ENI Manager & Senior Application Specialist
Matt is an ENI Manager and Senior Application Specialist in Ideate, Inc.’s Seattle office. He has a B.S. in Mechanical Engineering and is a licensed Civil Engineer. Prior to joining Ideate, Matt worked as a civil engineer, using Civil 3D on a variety of projects including site development, roadway improvements and infrastructure design. With over 10 years of experience in the civil engineering industry, Matt now provides training, consulting, technical support, and implementation strategies for organizations transitioning to Civil 3D. Matt is an Autodesk Certified Instructor (ACI), as well as an Autodesk Certified BIM Specialist: Roads and Highway Solutions. Additionally, Matt is and Autodesk Certified Professional for AutoCAD, and AutoCAD Civil 3D. He can be found on twitter as @MattM_PE

September 27, 2016

Export a Bridge Model from InfraWorks 360 to Revit with One Click

Ok, I lied – it is three clicks: left click – right click – left click.

But seriously, it is that easy with the release of InfraWorks 360 2017. We, at Ideate, are dedicated to highlighting and bringing these nifty new features to you, saving you time and research.


Alright, jumping in; if you conceptualize a bridge using the bridge design tool in InfraWorks 360, you can take it to Revit for structural detailing, analysis, rebar layout, documentation and construction.

One, left click on the bridge model in InfraWorks, let’s say on a pier or its cap.

Two, right click.


Three, left click, select "Send to Revit." 
The command will start cranking and building the model in Revit.
It will build the Revit families and generate the model without any user input.
Then, Voila!, it opens the model in Revit!
You are now free to continue with detailed design and analysis using Revit, and it all started with a conceptual bridge design in InfraWorks 360.
If you want to learn more about InfraWorks, start by signing up for our Intro to InfraWorks online e201 and one of Ideate's experts will guide you through the basics so you don’t have to dig in on your own.

For more information on the software solutions, training and consulting Ideate provides, please visit the Ideate Inc. website.

Senior Application Specialist Infrastructure 
Gaurav is a Senior Application Specialist for Infrastructure Solutions at Ideate based out of San Francisco. He has over 18 years of experience in construction and related software industry. With this extensive design technology background he helps engineering and surveying companies, federal and state government agencies, and ENR 500 firms critically analyze and improve their construction drawing production process. He implements Civil infrastructure design technology led by InfraWorks and Civil 3D and has helped Ideate grow Civil Infrastructure Services. Being an industry recognized speaker he has presented cutting edge design technology at several industry conferences such as Autodesk University. Find Gaurav on Twitter.

February 4, 2016

Export Selected Objects in Infraworks 360


Recently, while reading through some of the new posts on the Autodesk Infraworks 360 IdeaStation (http://forums.autodesk.com/t5/infraworks-360-ideastation/idb-p/129/tab/most-recent), I came across a request for exporting selected model content rather than the entire model.  Anyone that has used Infraworks 360 and tried to do this in the past may have noticed that the export options are fairly limited.  There is an option to define a polygon or boundary box interactively, but what if we want a handful of buildings that aren’t near one another, or two specific roads that form an intersection in the model?


In the most recent version of Infraworks 360 (2016.3) there are two export options that include 3D model data.  The Export IMX function produces data compatible with Autodesk AutoCAD Civil 3D and the Export 3D Model option produces a .FBX file compatible with other Autodesk 3D modeling programs.  Both options can be found under the Settings and Utilities icon in the application.

When selecting Export 3D Model, the options include Single File (all Feature Types exported to a single .FBX file) or Multiple Files (separate .FBX files for each Feature Type).  Although this does provide a multiple file option, the export still includes ALL objects of the same feature type and not a user defined selection set. 

In the IMX Export function, the options are even more limited.  It does include the polygon or boundary box selection methods, but that’s it.  Beyond defining the area of interest, every feature within that area is automatically included and exported to a single .IMX file.  With large models, this also increases the amount of time required to generate the file during export and process the file during import.

Since we are not able to add new features to the program on our own (vote for them by clicking on “kudos” next to the request on the IdeaStation: http://forums.autodesk.com/t5/infraworks-360-ideastation/export-of-selected-objects/idi-p/5986686) we need a workaround to accomplish this process.  Because we are defaulted to exporting everything in the model, or everything of a particular feature type in the model, the solution requires a model that only has the features and objects we want in it.  In this case, the workaround involves creating a new blank model, and the right-click Copy & Paste In Place options.

Step 1: Copy Features/Objects of Interest from Original Model
1. Open the Original Model File
2. Select Objects (use CTRL+Click to select multiple objects)
3. Right-Click COPY


Selected Objects for Copy/Paste (3 Buildings & 3 Roads)

Step 2: Create a New Blank Model & Paste Content In-Place
1. Use the Switch to Home icon in the upper left to go back to the Infraworks 360 Home Page
2. Select the New option to create a new model
3. Provide Name and location information for the new model
*The new blank model will open with a default view somewhere on the globe.
4. Right-Click PASTE IN PLACE
*The Paste In Place option ensures that the components are placed in the same location relative to the original source model that they were copied from.  The model will NOT automatically zoom to the location of the pasted objects.
5. Click on the HOME icon in the upper right corner of the View Cube to zoom to the model content


New Model with Pasted Content Ready for Export

Step 3: Export the New Model
1. Use the Settings and Utilities Export 3D Model or IMX Export options to export the new model


Although the workaround does require a few extra steps to create a new model, the end result is what we were looking for; an exported file that includes only the selected objects of interest rather than the entire extent of the original model.

If you would like to see an option for exporting a user defined selection set of objects in Infraworks 360, be sure to vote for it on the IdeaStation (link provided above).  Until then, copying and pasting content into a new blank model for export gives us an easy workaround solution.

Thank you for reading. For more information on Revit and other Autodesk products, and information on training and consulting for the various products Ideate services, visit our website at www.ideateinc.com.


ENI Manager & Senior Application Specialist

Matt is an ENI Manager and Senior Application Specialist in Ideate, Inc.’s Seattle office. He has a B.S. in Mechanical Engineering and is a licensed Civil Engineer. Prior to joining Ideate, Matt worked as a civil engineer, using Civil 3D on a variety of projects including site development, roadway improvements and infrastructure design. With over 10 years of experience in the civil engineering industry, Matt now provides training, consulting, technical support, and implementation strategies for organizations transitioning to Civil 3D. Matt is an Autodesk Certified Instructor (ACI), as well as an Autodesk Certified BIM Specialist: Roads and Highway Solutions. Additionally, Matt is and Autodesk Certified Professional for AutoCAD, and AutoCAD Civil 3D. He can be found on twitter as @MattM_PE

December 15, 2015

Going from 2D to 3D Using Infraworks 360 and Autodesk AutoCAD Civil 3D with Raster Design

Have you ever thought about the difference a 3D model would make when compared to a 2D sketch or plan?  Using Autodesk AutoCAD Civil 3D and Infraworks 360 can take you from 2D to 3D in a matter of minutes, and it’s probably much easier than you think.

Recently, while researching a project for one of our customers, I came across a 2D proposed site plan on the internet and wanted to show that in 3D context using Infraworks 360.


Basically, I wanted to turn this:
  

into this:      


Although it seemed like an easy option, considering images can be used as an Infraworks data source, it did not go as smoothly as planned.  Because Infraworks 360 is a geographic coordinate driven database, data sources need some type of location data in order to understand where they belong in a model.  With most standard images, these coordinate files are not provided.

My first step was determining an accurate position for the standard non-coordinate based image.  The second step was then creating the coordinate file for the image that provided Infraworks 360 with the data it needed to use the image in my model.  I also wanted to use tools that were readily available in my current Autodesk products rather than going to an outside source to generate any additional data.

After a little bit of thinking, I realized that the combination of Autodesk AutoCAD Civil 3D, along with Raster Design and the new Geolocation feature would provide me with everything I needed to geolocate the image and generate a supplemental world (.TFW) file for the TIFF (.TIF) image that I wanted to use.  Once I had the world (.TFW) file, the image had all of the data it needed to be a valid Infraworks 360 data source.  This also works for JPEG (.JPG) files by generating the accompanying world (.JPW) file.

The project started out with a small planned development in the corner of two intersecting streets.  Locating and generating a preliminary model took about five minutes using Infraworks 360’s Model Builder feature.
 
 Preliminary Infraworks 360 Model Builder Data
 
I also had a preliminary site plan of the proposed development in .PDF format found on the internet (http://www.mspsinc.com/park-plaza-shops).
 
Park Plaza Shops (Main Street Property Services, Inc).
 
Converting the .PDF to an image file was not difficult to do.  Attempting to use the image as a data source is where I ran into the first issue.  Without a world file, attempting to use the image as a Raster data source in Infraworks 360 produced a quick (and very limited) error that simply said “Failed to Import Data.”  Not a lot of information is given there, but the reason is that the “Raster” data sources are organized into rows and columns that contain values (data) representing information associated with those cells.  Without the data, the plain image file did not meet the requirements of being a “Raster” image source.

In order to fix this, I needed to create the data that went along with the image, and for that I used Autodesk AutoCAD Civil 3D with Raster Design.
Because I had limited information on the project itself outside of the address, I started out with a blank Civil 3D drawing and an assigned coordinate system.  From there I used the Geolocation feature to download an aerial image of the project site in my drawing.  This gave me a geolocated visual reference of where the sketched image needed to be.
 
Autodesk AutoCAD Civil 3D Geolocation Aerial Image.
 
Once I had the aerial image in Civil 3D, it was relatively easy to insert the image, scale and rotate it into place using the ALIGN command.  One thing to note here is that it is an approximate location based on visual references.  Since my intent was to use this as part of a preliminary model in Infraworks 360, this level of accuracy was acceptable for that purpose.
 
Autodesk AutoCAD Civil 3D Drawing with Overlaid Tiff Image.
 
Now that everything was in place, all that was left was to export the Raster data from Civil 3D.  Using the ISAVEAS and IWORLDLOUT commands allowed me to save a new image and export the associated world file for that image containing the coordinate data provided by Civil 3D (this came from the coordinate system that was assigned to the drawing file).  These two files now provide the necessary data for the image to be used as a Raster data source in Infraworks 360.

Image (.TIF) and World (.TFW) Files Exported from Autodesk AutoCAD Civil 3D

Back in Infraworks 360, I went through the same process of importing Raster data, and this time everything went as expected.  After configuring the data source to assign the proper coordinate system, the image appeared as Ground Imagery in the model.

 Infraworks 360 Model with Custom Ground Imagery.
 
...And with another few minutes in Infraworks 360, I added some 3D features for more visual impact...
  
Infraworks 360 3D Site Plan
 
Using Infraworks 360 and Autodesk AutoCAD Civil 3D, I went from a 2D Site Plan to a 3D conceptual model in just a matter of minutes.  Next time you’re looking for something to take your proposals to the next dimension (2D to 3D!), consider Infraworks 360.

For more information on training and consulting for the various products Ideate services, visit our website at www.ideateinc.com


Ideate ENI Manager & Senior Application Specialist

Matt is an ENI Manager and Senior Application Specialist in Ideate, Inc.’s Seattle office. He has a B.S. in Mechanical Engineering and is a licensed Civil Engineer. Prior to joining Ideate, Matt worked as a civil engineer, using Civil 3D on a variety of projects including site development, roadway improvements and infrastructure design. With over 10 years of experience in the civil engineering industry, Matt now provides training, consulting, technical support, and implementation strategies for organizations transitioning to Civil 3D. Matt is an Autodesk Certified Instructor (ACI), as well as an Autodesk Certified BIM Specialist: Roads and Highway Solutions. Additionally, Matt is and Autodesk Certified Professional for AutoCAD, and AutoCAD Civil 3D. He can be found on twitter as @MattM_PE


Get it. Know it. Use it.
 

August 5, 2015

The New Flavors of Autodesk InfraWorks 360


As the ENI Team Lead and a Senior Application Specialist at Ideate, Inc.  Autodesk InfraWorks has been one of my primary applications for quite some time.  Over the years it has gone through a number of updates, enhancements and even changed its name (more than once).  In 2016, we have a new set of InfraWorks products, and here’s a little bit of information that may help clear things up. First, let’s start with product naming.  We are now down to just two options, which are:

Autodesk InfraWorks 360 and Autodesk InfraWorks 360 LT

Autodesk InfraWorks 360 LT replaces the Autodesk InfraWorks version that was previously included as a subscription entitlement with the Design Suites (Building Design Suite Ultimate or Infrastructure Design Suite Premium and Ultimate).  It is also available for purchase as a stand-alone product for non-Suite product owners.

Autodesk InfraWorks 360 is the “full” version of InfraWorks in 2016 and is a separate software purchase.  It includes additional functionality beyond what is included with the LT version, and can also be upgraded with additional modules for Road, Bridge and Drainage Design (requires additional purchase).

The second big change is the lack of a Serial Number with Autodesk InfraWorks 360 installations.  For owners of one of the above mentioned Design Suites, Autodesk InfraWorks 360 installs as a 30-day trial with the Suite.  This does not require a serial number, and activates the full version of the product for 30-days.  After the trial period is over, the installation reverts back to the LT version unless an upgrade to the full product version is purchased.

Now you might be thinking “If there’s no serial number, how do we know what we have?”

This is where your Autodesk 360 (A360) account comes in to play.  When a full seat of InfraWorks 360 is purchased, the software manager at your organization must assign the product entitlement to the end user that will be using the application.  This is done through A360, and must also be done with the additional modules that are available for purchase.  Once the product entitlement has been assigned to a user’s A360 account, logging in to A360 after launching the application enables (or disables) the features that the end user is entitled to.  It sounds like a complicating process, but this actually allows an end user to change computers, or go from a desktop to a laptop without having to worry about uninstalling and reinstalling the application.
An A360 account with no entitlements can log in to Autodesk InfraWorks on any workstation and the program will revert to the LT version where you can open and access models, but all other features have been disabled.


Autodesk InfraWorks 360 LT (login using A360 ID with no entitlements)
 

When an A360 ID with full entitlements is used at login (on the same installation), the application loads and enables all available features that have been assigned to that user. 
 
 
Autodesk InfraWorks 360 (login using A360 ID with full entitlements)

The full version of Autodesk InfraWorks 360 has significantly more features available, including the Model Builder, Groups, the ability to create new models from scratch, design Modules (Road, Bridge and Drainage) and a number of “preview only” features that have not yet been fully released.  Also included, but not shown are additional cloud-based optimization tools accessible through an A360 account with cloud credits.
 
A full comparison list of features in Autodesk InfraWorks 360 and InfraWorks 360 LT can be found below....


A So regardless of if you’re an existing user, new user or future user, now you know what options are available in the 2016 version of Autodesk InfraWorks 360.

For more information on training and consulting for the various products Ideate services, visit our website at www.ideateinc.com


Matt Miyamoto

Ideate ENI Manager & Senior Application Specialist

Matt is an ENI Manager and Senior Application Specialist in Ideate, Inc.’s Seattle office. He has a B.S. in Mechanical Engineering and is a licensed Civil Engineer. Prior to joining Ideate, Matt worked as a civil engineer, using Civil 3D on a variety of projects including site development, roadway improvements and infrastructure design. With over 10 years of experience in the civil engineering industry, Matt now provides training, consulting, technical support, and implementation strategies for organizations transitioning to Civil 3D. Matt is an Autodesk Certified Instructor (ACI), as well as an Autodesk Certified BIM Specialist: Roads and Highway Solutions. Additionally, Matt is and Autodesk Certified Professional for AutoCAD, and AutoCAD Civil 3D. He can be found on twitter as @MattM_PE
Get it. Know it. Use it.

August 28, 2014

Optimal Video Card Settings for InfraWorks

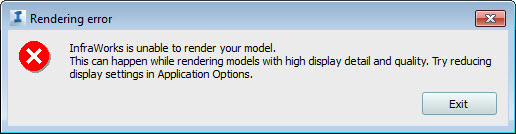
While prepping for an InfraWorks demonstration at Ideate Inc., my InfraWorks kept crashing. An error message would pop up informing me to change my 3D Graphics Settings. I changed the settings to a low level of detail to no avail. The program kept crashing.
Error Image Within InfraWorks
I did some snooping into my graphics card settings. My computer has two graphics cards, an Intel and an NVIDIA card. The Intel card is used for lower level graphics while the NVIDIA card is used for higher level rendering programs, such as InfraWorks. The settings for 3D graphics on my NVIDIA card did not include InfraWorks, therefore InfraWorks was not using the NVIDIA card, but was using the Intel card for rendering. The Intel card cannot handle the high level graphics of InfraWorks, and was crashing the program. 

I added InfraWorks to the NVIDIA card 3D settings, and this fixed the problem. I have detailed this process in the following images. 

To do this, right click on your desktop and choose your video card from the menu options. 
Video Card Selection
Next, select Manage Settings from the tasks on the left side of the NVIDIA Control Panel window. Make sure you are on the program settings tab. 
Program Settings
Find InfraWorks from the drop down menu, then select Add. 
Add InfraWorks

Verify that you have selected InfraWorks in the select a program menu, and click Add Selected Program. 
Add InfraWorks to Selected Programs
Lastly, to ensure this change is made, select Apply in the Manage 3D Settings window. You can now close your NVIDIA Control Panel. 
Apply Settings
Check out our website for information on training and consulting for the various products Ideate services, visit our website at www.ideateinc.com.


Kate Ming, P.E.
Ideate AEC Application Specialist


Kate is an Application Specialist at Ideate, Inc. and a Professional Engineer with 6 years of industry experience. At Ideate, Kate provides training, consulting and technical support services for our customers.


July 8, 2014

Autodesk InfraWorks 360: Round Buildings & Square Water Areas

Ideate Inc. has been part of the InfraWorks Participatory Design Council for a while now, and that has given us a chance to pick the brains of some of Autodesk’s best technical specialists to find out how to do things that we (and our customers) have been asking about. Here’s one of my favorites… 

Anyone who has been using Autodesk InfraWorks and InfraWorks 360 will know by now that the defaults in the program generate cornered buildings and rounded ground and water features. In reality, we also know that buildings can be round, and water and ground coverage areas can have corners. 

Although there is no built-in option from any menu that allows you to control this setting, there is a variable within the InfraWorks resource files (.JSON) that controls the value for corner radii. 

The value is called SmoothParam, and can be found in the .JSON files for the respective elements. Building settings are in the Buliding.JSON file and Water settings are in the Water Area.JSON file. The files themselves are saved as part of the individual InfraWorks model’s backup files, so you may have to do some digging to get to the folder. 

A typical path would be: <InfraWorks Models Folder>\<Model Name>\.files\unver\DrawTools  

The key folders to look for are <Model Name>.files, which is generated for every model, and the unver/DrawTools folder inside of that location that contains all the .JSON files. The image below shows the .JSON files for a model named Spreckles that was saved to my Autodesk InfraWorks Models folder.


Once you find these files, open the one you want using Notepad, and modify the SmoothParam value to adjust the corner settings for those elements. When working with .JSON data, there are some important things to know. 
  1. .JSON files are generated for the model when the elements are added in InfraWorks. For example, if your model does not include (and never has) any water features, the Water Areas.JSON will not exist. You’ll need to create an element of that type first so the .JSON file is generated, then you can edit the setting.
  2. The .JSON files are referenced by the model when the model is originally opened. That being said, any changes you make to variables within .JSON files require you to close and re-open the model before those changes take effect.
  3. The default values to use for SmoothParam are between 0.00 to 0.499. The default value for Buildings is 0.00 to create corners, and 0.499 for Water Areas to create fillets.
  4. You can use any number 0.00 or higher. You’ll get some funky shapes if you get anywhere near or above 1.0, but it is worth checking out just to see what happens. 
Here are a couple of samples. In the screenshot below, the SmoothParam for water areas was set to 0.00 and 0.499 for buildings. That produces Rounded buildings and square water features. There’s also a square ground coverage area which was created by setting that SmoothParam value to 0.00 as well.

 
The fancier looking buildings below were created in the same model using SmoothParam values between 0.65 and 0.99. Anything above 1.0 gets difficult to control. (I’ve already tried setting it up to 100.)


At this point, you may also be thinking that there’s got to be an easier way to do this than changing the value, saving, closing and re-opening the model every time you want something to look different. At least that’s what I was thinking. 

Fortunately, the Copy and Paste functions work from model to model in InfraWorks. That means you can spend some time creating a handful of custom objects in a file like I did above, then simply copy and paste them into a new model whenever you need it. On top of that, the components you copy remember what SmoothParam value they were created with, so you can edit them accordingly without having to change anything in the new model. You can also use the Add Vertex option after copying to modify the shapes as much as you want. 

Now you know how to customize your models a little more to include round buildings and square water or ground coverages. And, you’ve got an idea on how to save some time by creating a sample file with predefined custom elements that you can copy whenever you need them. 

Happy modeling! 


Matt Miyamoto, P.E.
Ideate AEC Application Specialist

Matt is a licensed Civil Engineer in the state of Hawaii. Matt obtained a BS in Mechanical Engineering from the University of Hawaii at Manoa, and has 7 years of private sector design experience which he applies in his role as an application specialist with Ideate, Inc. His project experience includes residential and commercial site development, private and public sewer, water and drainage systems, harbors improvements, and roadway improvements. While in Hawaii, Matt was involved in multidisciplinary projects for City and County agencies, State Departments, the Army COE and private developers. @MattM_PE

Get it. Know it. Use it.

October 16, 2013

The Flavors of Autodesk InfraWorks

As a Technical Expert in Infrastructure at Ideate, I need to know the intricacies of the different versions of InfraWorks. I thought you might like a quick guide to the differences. Here goes:
 

Autodesk InfraWorks 360 Free app (on iTunes) – Download from the iTunes store.  The app has the most basic functions of navigation and model review for the iPad and iPhone and works with Autodesk 360.
 

Autodesk InfraWorks – Available as a standalone product, this version includes the basic features for model creation (installed with its own SN, and not from design suite).
 

Autodesk InfraWorks R2 – Available as a Product Enhancement on Subscription Center to owners of Infrastructure Design Suite Premium. Along with added features from your suite purchase like cloud credits, this version also includes enhancements like the ability to use RVT files as a data source without owning Revit. This version is also available to Building Design Suite Ultimate customers and adds the .RVT file option that was not part of the original install.
 

Autodesk InfraWorks +Ultimate R2 – Available as a Product Enhancement on Subscription Center to owners of IDS Ultimate. It is similar to R2 above, and also includes cloud based optimization, design roads, cloud credits, etc.
 

Autodesk InfraWorks 360 Pro – Available as short term (quarterly) or annual renewal, this version is purchased separately from BDS and IDS packages. It does NOT include cloud based optimization or enhanced road design functions that are available to subscription and +Ultimate R2 owners. It’s similar to the Autodesk InfraWorks item above, but with short term licensing options.
 

*monthly licensing options may also be available
 

Autodesk InfraWorks 360 Pro with Autodesk Roadway Design for InfraWorks 360 Pro – Available as short term (quarterly) or annual similar to 360 Pro, but also includes the Autodesk Roadway Design add-on. The Roadway Design add-on is an additional purchase that must be added to the InfraWorks 360 Pro product above. This is the highest level of InfraWorks available and includes more features and functions than the products listed above. Some of the enhanced features include Documentation Tools and Sight Distance Tools that are NOT part of any other version.
 

*monthly licensing options may also be available
 

Autodesk’s comparison matrix offers more details about the different InfraWorks offerings. 

Introduction to InfraWorks Online Class
If you’re interested in finding out more about Autodesk InfraWorks, we’ve got a 90-minute online class available through our website. The intro course covers basic functionality of the program and teaches you how to import and connect to existing data sources and create a conceptual plan for a roadway project.
 

Infrastructure 201: Intro to InfraWorks
 

Visit our website at www.ideateinc.com for information on various products, training, consulting and services. 


Kate Ming
Ideate AEC Application Specialist

Kate has a BS in Civil and Environmental Engineering from UC Berkeley. Prior to Ideate, she worked at a multinational company for four years doing general civil design on large infrastructure projects. She is versed in roadway, rail, and utility design. She also has experience with utility demand analysis and Low Impact Development plans. At Ideate, Kate provides training and support for Civil 3D, AutoCAD, and Navisworks.  

Get it. Know it. Use it.

July 12, 2013

Autodesk InfraWorks 2014 Proposals and Scenarios

At Ideate, we are reviewing the latest release of Autodesk’s Suites. New to the Infrastructure Design Suite is Autodesk InfraWorks, a re-branded and enhanced Autodesk Infrastructure Modeler (AIM). Autodesk InfraWorks is an easy to use, high-level collaboration, communication and visualization tool for planners, designers, and anyone else involved in the planning and pre-design phase of a project’s lifecycle. 

Two new features in InfraWorks are the ability to create Proposals and Scenarios. Proposals allow a user to develop simultaneous design alternatives while Scenarios allow a user to share designs online with groups of other users through an Autodesk 360 account.

Proposals
A Proposal is a design alternative. It is a set of InfraWorks objects developed on top of your existing data. A user can have many proposals in the same design footprint, allowing for multiple design alternatives. This can be done quickly and is useful for working with clients in real-time.

You access the Proposals dialog box on the home tab of the InfraWorks Ribbon, as seen in the image below. You can add different InfraWorks objects to create proposal components, as identified in the Proposals Dialog Box. To add components to a proposal, use the create/edit features tool bar. A user will need to make sure that objects are being added to the correct proposal. To do this, a user must set the correct Proposal in the drop down list in the Proposals Dialog Box, or the proposals drop down list above the InfraWorks Ribbon. Users can create, delete, and merge proposals in the Proposals Dialog box.

InfraWorks Ribbon

Proposals Dialog Box

Scenarios
A Scenario is an isolated geographical section of a chosen proposal which can be shared with other users. The Scenarios dialog box is accessible on the Present tab of the InfraWorks Ribbon. From the Scenarios dialog box, you can create, delete, edit, copy, and publish Scenarios as well as create Scenario files. A user can name, define the geographical extents, edit a few basic settings, and determine a display resolution for a Scenario, as seen in the Create/Edit Scenarios Dialog Box. Once a Scenario has been created, it can be published to a particular group to be viewed in either in an InfraWorks 360 mobile application or the InfraWorks desktop application. It can also be viewed in a web browser.

InfraWorks Ribbon
 
Scenarios Dialog Box
 
Create/Edit Scenarios Dialog Box

Both Proposals and Scenarios allow a user to effectively and efficiently communicate design intent of multiple design alternatives. I encourage you to check out these new features.

Visit our website at www.ideateinc.com to see what Autodesk InfraWorks can do.


Kate Ming
Ideate AEC Application Specialist

Kate has a BS in Civil and Environmental Engineering from UC Berkeley. Prior to Ideate, she worked at a multinational company for four years doing general civil design on large infrastructure projects. She is versed in roadway, rail, and utility design. She also has experience with utility demand analysis and Low Impact Development plans. At Ideate, Kate provides training and support for Civil 3D, AutoCAD, and Navisworks.  

Get it. Know it. Use it.