Toolbars have stepped into the future with a new name: Ribbons.
You add that to the new Menu Browser, new icon images, new status bar icons, and the new off-white background; and you’ll think you’re using a totally different program. After getting over the initial shock of the new interface, you’ll discover some great new features in 2009. Not only do “the little things” make it worth the upgrade, but there are some big features to consider as well. And fear not…you can always have it back “the old way” which we are calling “Classic”. Again…this is not your father’s AutoCAD.
Items to beware of before you do anything:
- To migrate or not to migrate your custom settings. Migrating your custom settings will bring your existing menus, toolbars, workspaces, etc. into the new 2009 interface so you will not see all “the new stuff”. It will however, create a “<<2009 Unnamed Profile>>” that has the new environment but if you bring in the workspaces from 2008 with the same names as 2009 it will overwrite the new, so migrating your settings is up to you. I chose not to, just to have the benefits of the new interface, and if needed you can always migrate your settings later should you need to, just go to:
Start > Programs > Autodesk > AutoCAD “version” > Migrate Custom Settings.
- Ribbons. Ribbons may not be worth the upgrade and they may take a bit of getting used to. They are much more powerful and useful than a standard toolbar, but it’s a new way of thinking. I’m personally not ready for Ribbons, and I don’t think a lot of others are either. I’m definitely giving them a try, as it seems to be “the way of the future” so get ready and start using them; ready or not.
- The Dashboard. Stop customizing the Dashboard immediately. If you are using 2007 or 2008 and use the Dashboard it has been discontinued. Some may argue that the Ribbon is in fact the Dashboard and a new and improved Dashboard nonetheless. True…the Dashboard command will bring up the Ribbon; a Super-Dashboard…the Ribbon is usually docked along the top. You can undock this to work like the Dashboard Palette. I am referring however to any customization done in the Dashboard does not transfer into the Ribbon. There is rumor of a utility that will “convert” control panels, but no official promise as of yet.
- 2007 is still the file format being used in 2009.
Major new features and my Top 5 reasons for upgrading now:
- Action Recorder
I love lisp and vlisp, diesel, macros, you name it. I worked on the Express Tools team, so you have to believe me…The Action Recorder is like an “F12” button you find in other programs to record what you are doing and creates a “macro”. It saves these files out so they can be used by anyone. They are called .ACTM files, and no programming background required. This is amazing! It’s better than using script files and great for using when you have a repetitious task you wish you could create a quick routine for. Worth it…worth it…worth it.
- Status Bar
I’m putting this as #2. It’s the little things sometimes that do it and there has been a minor change to some standard drafting settings buttons. I’m referring to Polar Tracking and Object Snaps (OSNAP). You can right click on Polar and switch it from 30 to 45, you can right click on OSNAP and add Midpoint, and not as an override but as an addition to your running Object Snaps. Quick Properties has been added as a new on/off toggle (great new feature). The part I am not so happy about is the design of the icons. You can right click on Ortho, Polar, the new QP, etc. and chose to “Use Icons” or not. Who came up with those new icon images anyway??..
- Layer Manager
Layers are the most important way to organize your drawings. The Layer panel on the Ribbon is well laid out. The new Layer Properties Manager is now a “modeless” dialog box. That basically means it’s a Palette. That’s right…the Layer Properties Manager is now a Palette. No more OK or Apply button and you can use your Layers transparently. Can you image? So when you are drawing, moving, offsetting, etc. you can hover over you Layer Palette and turn on or off Layers (transparently) and continue to work. Nice, eh?
- Menu Browser
You know…this is kind of nice. Why have a menu system when you can have a “Googley-type” menu browser; and that’s how it gets its name…it’s a Menu-Browser. The dropdown menus are hidden (you can unhide them) underneath the new icon in the upper left hand corner of AutoCAD. Just click on the “A” and you will see your File, Edit, Draw, Modify, Express menus, etc. There is a search bar (try typing: LINE). You can “pin” recent drawing files in the recent drawing list or even show them as icons and images (recent files list goes wayyyyy past 9 files now, to 50 I believe). You can go into your OPTIONS dialog box from here, exit AutoCAD, and list your recent “Actions” from your menu selections…this is great. If you want your menus back > set MENUBAR to 1 or right click on your “Quick Access Toolbar”. Alt keys still work as well to display menu actions.
- View Cube
I put this last and should mention the new ShowMotion, or the Steering Wheel but the View Cube is my favorite. This great new navigation tool gives you a nice visual (and selectable) box and compass to quickly navigate around in 3D. You can always use Named Views, Predefined Views, the middle mouse wheel, etc. but this new View Cube is terrific for quick navigation in a 3D environment.
Items to beware of after you’ve been working with 2009:
How do I get my Menus? How do I get my Toolbars? How do I change the icons back? How do I show my Layout tabs? Etc…
If you want to make it look like the old way (or “Classic”), then remember to right click.
Right mouse click on your Quick Access Toolbar and you can show your standard toolbars and your menus. Right click on the Layout icons or the drafting setting icons, and you can display them the way you’d like, and so on. So…if you type MTEXT and you see the new Ribbon tab for the MText Editor and completely freak out, what are you going to do?...Right click to display things the way you’d like.
You should check out OPTIONS dialog to see what new additions have been added and what can be customized. Make your own Profile in OPTIONS, as well as create your own custom Workspaces with a combination of the “Classic” way and the new way. You can drag and drop items really easy in the CUI now and even drag and drop commands from the CUI right into the Quick Access Toolbar.
If you’d like the old dialog boxes, you can type CLASSICLAYER, CLASSICXREF, actually just type CLASSIC and hit the <Tab> key, this way you’ll know how to find them all as the list gets bigger.
Ribbons panels called “Contextual Tabs” will activate and add a Panel during the MText Editor, Tables, the Block Editor and In-place Block Editing (RefEdit).
- Mark D. Roach, Ideate Inc

 (Ensure your building is oriented correctly)
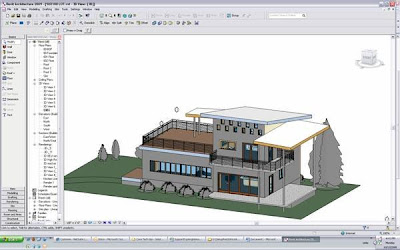
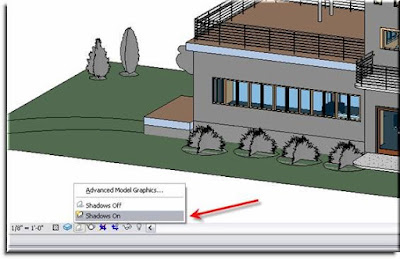 Next, turn your shadows [ON] at the Visual Graphics Control Bar:When you do this you will automatically notice that your building has an accurate representation of where the sun is in the sky and the model reflects this. While this is helpful, it currently doesn’t tell us
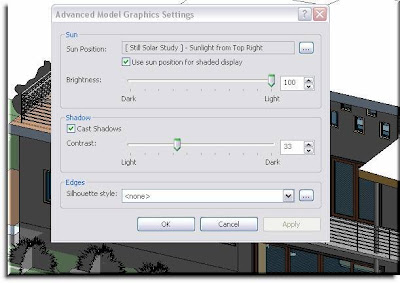 By default your Shadow Display will be set to something Generic like “Sunlight from Top Right”. To designate a specific city or indicate geographic coordinates select the small radio button next to Sun Position parameter "...".
 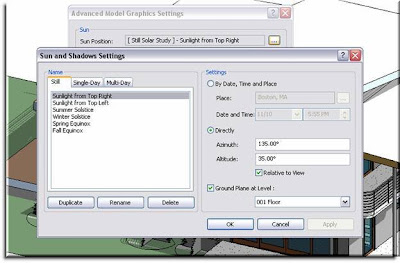 You should then see the “Sun and Shadows Settings” dialogue box. On the left side you have 3 tabs that give you the option to create one of three types of solar studies.
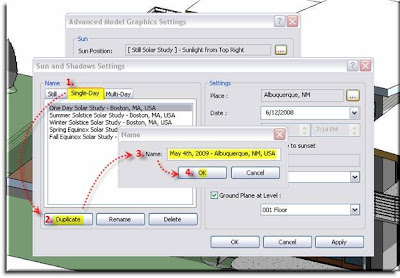 The new location will then be added to your list of single day locations. From here you will need to change the Place, Date, Time Range, and Interval which can be adjusted on the right portion of the dialogue box. (*The “Place” parameter does not automatically update when you create a new location. Be sure to make sure your selected location corresponds with your Place parameter before going forward.)
 This will bring you back to your Advanced Model Graphics dialogue where you can make any additional adjustments to your visual appearance. Apply these and press OK. (*A benefit of the Apply button, as in Windows, makes the changes but, doesn’t shut the dialogue box so if you don’t like the way it looks you can change it again without having to recall the previous dialogue.)
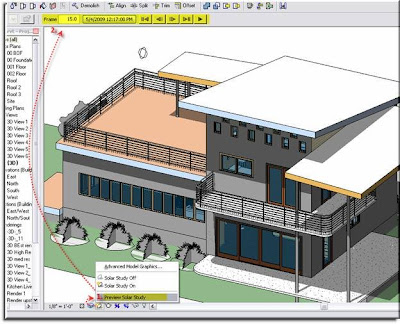 You will notice that this new options bar looks a lot like a Start, Stop, Play interface and that is essentially what it is. Here you can play the Solar Study, cycle through frame by frame, or skip from start to finish. The box next to the frame box displays the current settings and that you currently see on screen.
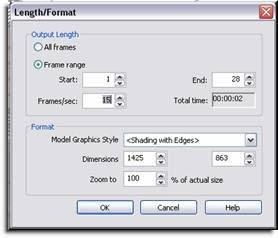
 Once you have gotten your Study to look as you wish you can export it as an .avi file. Simply go to File>Export>Animated Solar Study and adjust the settings to reflect the Length, Size, and Style of the .avi.
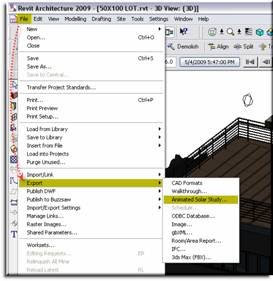