September 30, 2014

Customizing the Look of the Recent Files Screen in Revit (Or, Office Pranks)

Have you ever wondered how you can customize the font settings for the Recent Files screen in Revit? Perhaps the font style is a little dull for your taste, or maybe you would like for it to meet your office font standards.

While customization of the Revit interface is limited (without getting into the API) we do have the ability to make some minor changes to the Recent Files screen since it is mostly driven by the Internet Options settings in Windows. With a few simple changes, we can change the fonts (and the background color to white) to meet our needs. Give it a try sometime and if you feel like playing a little joke on one of your co-workers, pick a font style that no one can understand.


This is what the typical out of the box Recent Files screen looks like in Revit.
To change the fonts for the Recent Files screen, search your computer for the Internet Options. Once found, go to the General Tab and click on the Accessibility button under the Appearance section:
To change the default font on the Recent Files screen, place a checkmark in the “Ignore font styles specified on webpages”. You can also play around with other formatting settings as well, but the choices are limited. Click OK to return to the Internet Properties dialogue box.

Now click on the Fonts button under the Appearance Section to change the fonts.
Pick a font of your choosing. If you want to play a prank on one of your co-workers, select a font that no one can read and understand, otherwise, pick a font that meets your needs.
As you can see in this image, the font on the Recent Files screen has changed to the font of my choosing. In this case, I changed this font to a style that no one can understand.

Sash Kazeminejad, ACI, LEED AP
AEC Senior Application Specialist
Sash brings proficiency in Autodesk solutions including AutoCAD and Revit Architecture to Ideate customers. His industry experience includes project management, BIM Management, and design for Architectural firms in California, Montana and Oregon. He is LEED accredited professional and is on track to achieve California licensure with Oregon to follow. In his academic life, Sash was awarded a variety of college scholarships, earned a BA in Environmental Design, a MA in Architecture from Montana State University (MSU) and taught Building Information Modeling courses at MSU Gallatin College. As a Revit Architecture Autodesk Certified Instructor, Sash provides Revit Architecture training and support for AEC firms. @sashpdx

Get it. Know it. Use it.


September 29, 2014

elearning - Upcoming Classes: Revit, Civil 3D, Vasari, Ideate Software

Join the Ideate Tech Experts for eLearning – live online classes that provide your entire organization with easy access to premium education. 
10.1::Infrastructure 201:
Data Short Cuts
10.2::Ideate Software:
Revit Project Management with Ideate BIMLink
10.3::Navisworks 101:
Introduction to Navisworks Manage
10.7::Ideate 101:
Getting Started with Vasari
10.8::Revit 201:
Shared Parameters and Schedules in Revit MEP
Each class is designed to give you specific, improved results in a particular topic. You can interact with the instructor right from your own office, while eliminating travel time. Because the class schedule rotates, you can easily select your topics of interest and choose the day which best meets your schedule.

Click here for class descriptions, times and registration link. Questions? Contact education@ideateinc.com

Get It. Know It. Use It.

Classroom Training - Open Revit Architecture and AutoCAD Classes

Know It. Ideate Training.

Position yourself to land dream projects. Tap the full potential of your software solutions. Increase your facility, fluidity and capability to maximize the value of your precision software tools.
10.7-10.9::Seattle
AutoCAD Fundamentals
10.28-10.30::Portland
Revit Architecture Fundamentals
11.3-11.4::San Francisco
Revit Architecture Beyond the Basics
11.4-11.6::San Francisco
AutoCAD Fundamentals
Know your software. Sign up now!

September 23, 2014

Re-examining Revit Based Plumbing Fixture Calculations – Part II

In Part I we discussed the benefits and challenges of the various ways of calculating plumbing fixtures in Revit, including using Ideate BIMLink in recruiting the help of Excel for updating schedules. Now, I will discuss the various formulas required in schedules or family parameters to facilitate the calculation. The formulas are based on the 2012 International Plumbing Code (IPC).

Formula Construction Types

  1. Multiple Codes: The widespread adoption of the IBC/IPC codes in the US provides a baseline for the plumbing fixture calculations, but every jurisdiction chooses to amend or adopt portions of it. To clarify which code is in use for the analysis, build a parameter that identifies the Applicable Code.
  1. Gender split: The general rule is to split the total occupancy in half to determine the number of males and females. The IPC does provide an exception that allows and adjustment of male and female distribution given statistical data on the space usage. The code is silent on how to handle an odd distribution of people. To prevent over-designing the fixture count, it is best to use fractional numbers. The 1’^2 is used to maintain consistency of the units.
    The Male_ratio value is a decimal number from 0 thru 1, requiring user manual input. Build it as a Project parameter of the Area category for visual validation in the Area plan.

    Not all occupancies are required to be segregated by sex. Residential (Group R), Institutional (Group I), and Mercantile (Group M) occupancies with an occupancy less than 50 do not require separated restrooms. In these cases, build a schedule based on the single occupancy load.
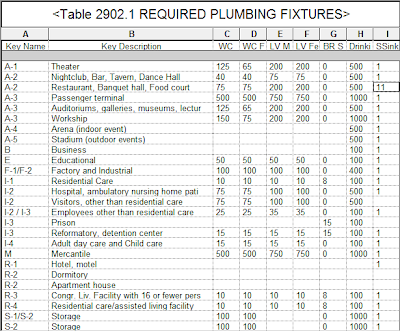
  1. Simple Ratios: Most occupancies use simple ratio factor per IPC Table 2902.1, and simple ratios are easy to do in Revit using calculated values. For example, the ratio for calculating drinking fountains in the B occupancy is 1 per 100.
    Code factors can be retrieved in formulas if you build them via Schedule Key Values, see Fig. 1 below.
  1. Occupancies with graduated ratios: Graduated ratios calculate fixture counts using a ratio for an initial number of occupants and another ratio for the remainder number of occupants. IBC applies a graduated ratio for calculating water closets and lavatories for the B, A-4, and A-5 assemblies. In Revit we can build such a requirement by using conditional formulas. For example, the IPC calculation of Water Closets reads: “1 per 25 for the first 50 occupants and 1 per 50 for remainder exceeding 50”. You can build graduated ratios in Revit using conditional formulas in calculated values:
  1. Calculations based on actual counts: The IPC prescribes for certain occupancies the use of actual counts instead of occupancy factors for fixture calculations, such as Groups I-2, I-3, R-1, R-2 & R-3 which are based on the actual number of rooms, cells, sleeping or dwelling units. For these occupancies, build a project parameter requiring user input. The advantage of a Project Parameter over a calculated value is that the value can be validated visually in the plan via instance parameter of the Area object.
  1. Fixture Substitutions: Urinals and Family/Assisted-Use toilets are typically calculated as substitutions by the IPC. The code allows up to 67% of the male water closets in Assembly and Educational groups to be substituted for Urinals, and up to 50% in all other occupancies. In Revit, the substitutions for each occupancy can be allocated as simple factors.
    Family or assisted-use “Unisex” toilets are a requirement for Assembly and Mercantile occupancy groups. The IPC permits the substitution of one toilet and one lavatory of the fixtures required by males and females but not both. In Revit, the total count of water closets and lavatories would be adjusted by subtracting 1 to either the male or female grand total.
    The problem here is that the plan displays fractional occupancies of the same group because the substitution must be applied to the aggregated fractional sum, making the calculated value invalid.

    For example, two B occupancies areas with required lavatories of 0.9, and 1.1 will need:

    (0.9+1.1)-1=2.0 fixtures
    and not:
    (0.9-1)+(1.1-1)=-0.1+0.1=0 fixtures.

    The same logic applies to Service Sinks, it is typically one unit per occupancy. The calculation of Unisex and Service Sinks cannot be constructed as calculated values when more than one area of the same occupancy are part of the schedule.
Conclusion Use the formulas discussed here to estimate code required Plumbing Fixtures. However, be aware of the limitations. Some formulas like Unisex Fixtures, Service Sinks, and Urinals, must be applied to aggregate fractional sums, and therefore cannot be used in calculated values where the occupancies are fractions. Also note that the construction of summary tables requires manual transcription and cannot be made parametric yet. We will continue searching for innovative ways to overcome these challenges. Questions or Comments? Send me an email, share your experiences with code calculations, and stay tuned to our blog for new solutions.


Cesar Escalante, AIA, LEED AP, CCCA
AEC Solutions Application Specialist

Cesar has a Bachelor of Architecture degree from the University of Central America in El Salvador, a Master of Architecture from the University of Texas, and is a CCCA (Certified Construction Contract Administrator). His experience includes roles as Project Manager and Project Captain at architecture firms in Oakland, California. As a member of the Ideate Tech Expert team, Cesar teaches Revit Architecture Fundamentals and provides client support and consulting. Cesar’s interest in the built environment includes his work as a volunteer for Habitat for Humanity.

Get it. Know it. Use it.


September 22, 2014

elearning - Upcoming Revit, Civil 3D, Navisworks and Vasari Classes

Join the Ideate Tech Experts for eLearning – live online classes that provide your entire organization with easy access to premium education. 
9.25::Revit 201:
Documenting Your Project in Revit MEP - Keynotes and General Notes
9.26::Infrastructure 201:
Intersection Design Tool
10.1::Infrastructure 201:
Data Short Cuts
10.2::Ideate Software:
Revit Project Management with Ideate BIMLink
10.3::Navisworks 101:
Introduction to Navisworks Manage
10.7::Ideate 101:
Getting Started with Vasari
Each class is designed to give you specific, improved results in a particular topic. You can interact with the instructor right from your own office, while eliminating travel time. Because the class schedule rotates, you can easily select your topics of interest and choose the day which best meets your schedule.

Click here for class descriptions, times and registration link. Questions? Contact education@ideateinc.com

Get It. Know It. Use It.

Classroom Training - Open Revit Architecture, Revit MEP and AutoCAD Classes

Know It. Ideate Training.

Position yourself to land dream projects. Tap the full potential of your software solutions. Increase your facility, fluidity and capability to maximize the value of your precision software tools.
9.30-10.2::Sacramento
Revit Architecture Fundamentals
9.30-10.1::San Francisco
Revit MEP Mechanical Fundamentals
9.30 + 10.3::San Francisco
Revit MEP Piping & Plumbing Fundamentals
10.7-10.9::Seattle
AutoCAD Fundamentals
10.7-10.9::Seattle
Revit Architecture Fundamentals
Know your software. Sign up now!

September 18, 2014

InfraWorks 2015: Import Sketchup Model

Last year I wrote a blog post on how to import a Sketchup model into InfraWorks. This post is essentially an update to that post. With the current release of InfraWorks the process has been simplified to just a drag and drop of a SKP file, which you can download from Sketchup 3D model warehouse. Here is a result:


However, as you drag & drop your SKP file I have noticed it will not bring the materials and textures associated with it, see below:


So the trick is to convert the SKP file to Collada, DAE, format by simply exporting SKP from the free Sketchup Make 2014 to get the following result:


So download and install Sketchup per the link above the export:


As you export to DAE it creates a folder with all associated material images.

Simply drag and drop the DAE file inside your InfraWorks model, assign it the right Type and place it interactively using your mouse. Click Close & Refresh.


You are done. Enjoy!


Gaurav Bagga
Ideate Senior Application Specialist,
Infrastructure Solutions

Gaurav is a Senior Application Specialist for Infrastructure Solutions at Ideate based out of San Francisco. He has over 18 years of experience in construction and related software industry. With this extensive design technology background he helps engineering and surveying companies, federal and state government agencies, and ENR 500 firms critically analyze and improve their construction drawing production process. He implements Civil infrastructure design technology led by InfraWorks and Civil 3D and has helped Ideate grow Civil Infrastructure Services. Being an industry recognized speaker he has presented cutting edge design technology at several industry conferences such as Autodesk University. Follow Gaurav on Twitter: @BeGeez

Get it. Know it. Use it.

September 16, 2014

Lines Display Blurry or Unsharp in AutoCAD 2015

While working on Ideate Tech support, a client had an issue with lines showing up blurry in AutoCAD 2015. This turns out to be a known issue that Autodesk is looking into. There are some work-arounds, however. 

The solution

It is most likely related to your graphics card driver.  Below is a list of possible fixes:

Option 1

  1. Turn Smooth line display off in the Graphics Performance Box
Option 2
  1. Edit special settings of the NVidia driver, “NVidia FXAA Anti-Aliasing” = OFF. You can find the NVidia control panel by right clicking anywhere on your desk top and choosing the NVidia Control panel.  Once in there, go to the Manage 3D settings, and choose AutoCAD on the Program Settings tab.  From there, you can make sure Antialiasing – FXAA is turned off.  Refer to the image below. 
  2. Turn Hardware Acceleration on in AutoCAD
Option 3
  1. Uninstall AutoCAD 2015 
  2. Update your Graphics card Driver
  3. Re-install AutoCAD 2015
Here is a link to the documented solution from Autodesk.

For more information on Autodesk products, continue to check out our blog.  Additionally, visit our website for information on training and consulting for the various products Ideate services, visit our website at www.ideateinc.com.


Kate Ming, P.E.
Ideate AEC Application Specialist


Kate is a California licensed civil engineer with a BS in Civil and Environmental Engineering from UC Berkeley. Prior to Ideate, she worked at a multinational company for four years doing general civil design on large infrastructure projects. She is versed in roadway, rail, utility design and site development. She also has experience with utility demand analysis and Low Impact Development plans. As a Civil 3D Autodesk Certified Professional Kate provides training and support for Civil 3D, AutoCAD, and InfraWorks.


September 15, 2014

Classroom Training - Open Revit Architecture an Revit MEP Classes

Know It. Ideate Training.

Position yourself to land dream projects. Tap the full potential of your software solutions. Increase your facility, fluidity and capability to maximize the value of your precision software tools.
9.17-18::Seattle
Revit MEP Electrical Fundamentals
9.22-24::San Francisco
Revit Architecture Fundamentals
9.23-25::Portland
Revit Architecture Fundamentals
9.30-10.2::Sacramento
Revit Architecture Fundamentals
9.30-10.3::San Francisco
Revit MEP Piping & Plumbing Fundamentals
Know your software. Sign up now!

eLearning - Upcoming Revit and Ideate Software Classes

Join the Ideate Tech Experts for eLearning – live online classes that provide your entire organization with easy access to premium education. 
9.16::Revit 201:
Rapid Detailing
9.17::Ideate Software:
Revit Auditing with Ideate Explorer
9.18::Revit 201:
Getting Started with Daylighting Studies and 3D Max Design
9.19::Revit 201:
Design Options
9.25::Revit 201:
Documenting your Project in Revit MEP
Each class is designed to give you specific, improved results in a particular topic. You can interact with the instructor right from your own office, while eliminating travel time. Because the class schedule rotates, you can easily select your topics of interest and choose the day which best meets your schedule.

Click here for class descriptions, times and registration link. Questions? Contact education@ideateinc.com

Get It. Know It. Use It.

September 11, 2014

Split a Revision Schedule in Revit

The ability to split a Revision Schedule has remained a long standing feature request. We can produce a fairly good workaround thru the use of conditional formulas within a Revision Schedule body. Want to know more about it? See the Split a Revision Schedule video explaining the process step-by-step with a detailed description of the actual formulas.

A quick workaround to split a revision schedule is thru the use of calculate values.


Cesar Escalante, AIA, LEED AP, CCCA
AEC Solutions Application Specialist

Cesar has a Bachelor of Architecture degree from the University of Central America in El Salvador, a Master of Architecture from the University of Texas, and is a CCCA (Certified Construction Contract Administrator). His experience includes roles as Project Manager and Project Captain at architecture firms in Oakland, California. As a member of the Ideate Tech Expert team, Cesar teaches Revit Architecture Fundamentals and provides client support and consulting. Cesar’s interest in the built environment includes his work as a volunteer for Habitat for Humanity.

Get it. Know it. Use it.

September 10, 2014

Re-examining Revit Based Plumbing Fixture Calculations – Part I

Fig 1: Schedule-based calculation of minimum plumbing fixtures for the Business Group
It may be reasonable to think that Revit could automate the calculation of plumbing fixtures from a given schedule of areas and occupancy loads. Well, think twice. A comprehensive calculation of fixtures in Revit that automates the required number of all types of fixtures (Water Closets, Lavatories, Urinals, Drinking Fountains, Showers, Service Sink, Unisex fixtures) still remains a somewhat elusive exercise. The underlying problem is that the Schedules are meant to quantify the parameter values of Revit project families, and are not really suitable to be used as worksheet for things that are not in the model. This hasn’t stopped us from searching for a way to push Revit to that point, or getting close to a parametric solution.
 

For someone starting to build this type of calculation in Revit, I will review the advantages and limitations of the different approaches used.
 

Before you start building your calculations, keep a few things in mind. First, make sure to keep the units for each calculated value consistent. I recommend building all the parameters of the ‘Number’ type and override the field format to ‘Fixed’ with a 2 decimal rounding increment. This will make the schedule values readable and clean. 

Second, consider recapturing the load data from the Revit occupancy calculations. These calculations are typically based on Revit Area Plans instead of Rooms because Area plans are more suitable to define the boundary limits of both Gross and Net areas as required by code factors. (See Fig. 2.) To maintain consistency of the of the occupancy load, duplicate the schedule of the building load calculation and use those calculated values to get started with your plumbing fixture calculation. More on Occupancy Load Calculations.

Fig 2: IBC Table 1004.12 Maximum Floor Area Allowances per Occupant, built in Revit as Schedule Key of the Area Category

The third consideration is regarding the rounding of values in mixed occupancies. Most codes are silent or generally vague about the rounding rules for aggregated data. In the absence of a clear cut direction, code specialist agree that the best approach is round to the upper integer the aggregated totals of every occupancy instead of the partial subtotals. Rounding up both the occupancy and fixture load in partial subtotals would increase the total count somewhere between 2%-5%, depending of the building size, increasing unnecessarily the building cost. The rounding, they agree, should occur after summing the fractional fixture counts for each occupancy group, keeping the total fixture count as low as permissible. Since Revit cannot round schedule grand totals, the task remains an outstanding feature request. Workarounds require manually rounding up the total and transcribing the result in a dummy key schedule, a process that would be repeated at every program change. 

Fig. 3: The rounding of fixture grand totals remains a long standing feature request.
Current Solutions 

Different solutions have been proposed to tackle the minimum plumbing calculation requirements. Regardless of the method, the actual difficulties become evident when applying different rules for mixed occupancy loads.

  1. Single Schedule: While it is possible to conceive of a single schedule for all of the plumbing calculations, this would be inaccurate and extremely complex to achieve. Since the formulas of calculated values apply to every instance, there is no choice but to build each assembly requirement as a separate schedule column, creating a lot of redundant calculations. For example, each calculation of the Assembly, Business, and Mercantile occupancies will require a separate calculated value for every fixture type. Excluding the values belonging to other occupancies is hard to do using Conditional Formulas. One cannot mix the text-formatted values of the Occupancies (ie B, or M) with any Numerical formulas, unless you assign a numerical value for each group. And even if the conditional formulas end up working, the totals of fixtures per type will be dispersed, turning the effort somewhat futile.
  2. Multiple Schedules by Occupancy Group: Because each occupancy utilizes different plumbing factors and/or load formulas, it may be more reasonable to build a single schedule for every occupancy. Formulas used in calculated values will respond to each occupancy requirement, and the major advantage is that all calculations get updated if the area boundaries change. Still, there will be no way to build a parametric summary of fixture totals. One workaround is to manually add the data into a Summary schedule key. The other alternate is to export each of the schedules as a .TXT file that are opened in Excel and pasted into a single worksheet to calculate totals. The data would require exporting to the schedules at every plan update, and the total need to be manually transposed into a summary schedule.
  3. Excel Calculations: This solution takes all the fixture calculations outside of the Revit environment. Excel certainly provides a wider flexibility to create the fixture count by occupancy group and a summary table. Areas and fixed counts would need to be exported or manually transcribed into an Excel Spreadsheet. The twofold problem is that there is not a way to push the totals back into Revit out of the box, and secondly any change in the area calculation would need to be manually transcribed every time the plan changes. Ideate BIMLink, a Revit add-on that pull and push Revit data with Excel, can certainly facilitate the process of re-importing the data into an existing area schedule or key schedule.
An Excel based script available for free is the Plumbing Fixture calculator posted by Ara Sargsyan. The calculator uses a built-in script in Excel and complies with 2012 IBC & IPC. 
Fig 4: Excel script generated plumbing fixture calculator.
  1. Annotation Family: This is a very elegant solution posted in AUGI forums by user cberteaux371801. Instead of using schedule with calculation values, the plumbing fixture calculations are shifted away from the project and managed as formulas embedded in family instance parameters. The benefit is a visually consistent schedule-like table for every occupancy groups. The user would load in the project an annotation symbol family for each of the occupancies in the building, and the calculation will run based on the occupancy load for the group. This method is almost perfect except that it will not read the occupancy load automatically. Any change in the occupancy loads would need to be transcribed at every change of the program and a summary table with the aggregated totals would still be required. See the original post for more information.
Fig. 5: Annotation Symbol family for the A-1 Occupancy Group. The calculations are driven by the Occupant Load and the Male Ratio which need manual input.
Fig 6: Annotation Symbol family parameter with the formulas for the Assembly Group A-1, complying with IBC & IBC 2012.
  1. API / Scripts?: Can some experimentation with API or Dynamo Scripting provide a better solution? With scripting, it is conceivable to develop a way to extract the occupancy totals and plug them as values into an Annotation Family. In a forthcoming post, I will explore in greater detail the potential of this approach.
Bottom Line: There is not a perfect automated solution yet that provides a parametric calculation of plumbing fixtures, nor a single solution that is universal. While it is possible to push the calculation into schedules and families, every solution requires some level of manual transcription.

If you decide to build your calculation using Families or Schedules in Revit, the code requirement would need to be translated into formulas compatible with Revit. In Part II of this blog post, I will discuss in greater detail the typical formulas used to construct these calculations.


Cesar Escalante, AIA, LEED AP, CCCA
AEC Solutions Application Specialist

Cesar has a Bachelor of Architecture degree from the University of Central America in El Salvador, a Master of Architecture from the University of Texas, and is a CCCA (Certified Construction Contract Administrator). His experience includes roles as Project Manager and Project Captain at architecture firms in Oakland, California. As a member of the Ideate Tech Expert team, Cesar teaches Revit Architecture Fundamentals and provides client support and consulting. Cesar’s interest in the built environment includes his work as a volunteer for Habitat for Humanity.

Get it. Know it. Use it.

September 9, 2014

Formula-Driven Surface Boundaries in Revit Using Dynamo

The new release of Dynamo 0.7 expands the ability to create script driven forms in REVIT. Here is the tutorial Part I of my Dynamo presentation at the San Francisco Revit User Group in June 2014, showing how to build a mass surface using reference lines driven by Math formulas.  

View the Formula-Driven Surface Boundaries in Revit Using Dynamo video.


Cesar Escalante, AIA, LEED AP, CCCA
AEC Solutions Application Specialist

Cesar has a Bachelor of Architecture degree from the University of Central America in El Salvador, a Master of Architecture from the University of Texas, and is a CCCA (Certified Construction Contract Administrator). His experience includes roles as Project Manager and Project Captain at architecture firms in Oakland, California. As a member of the Ideate Tech Expert team, Cesar teaches Revit Architecture Fundamentals and provides client support and consulting. Cesar’s interest in the built environment includes his work as a volunteer for Habitat for Humanity.

Get it. Know it. Use it.

September 8, 2014

eLearning - Upcoming Revit and Ideate Software Classes

Join the Ideate Tech Experts for eLearning – live online classes that provide your entire organization with easy access to premium education. 
9.9::Revit 201:
Curtain Walls and Storefronts
9.10::Ideate Software:
Revit Project Management with Ideate BIMLink
9.16::Revit 201:
Rapid Detailing
9.17::Ideate Software:
Revit Auditing with Ideate Explorer
9.19::Revit 201:
Design Options
Each class is designed to give you specific, improved results in a particular topic. You can interact with the instructor right from your own office, while eliminating travel time. Because the class schedule rotates, you can easily select your topics of interest and choose the day which best meets your schedule.

Click here for class descriptions, times and registration link. Questions? Contact education@ideateinc.com

Get It. Know It. Use It.

Classroom Training - Open Revit Architecture an Revit MEP Classes

Know It. Ideate Training.

Position yourself to land dream projects. Tap the full potential of your software solutions. Increase your facility, fluidity and capability to maximize the value of your precision software tools.
9.17-18::Seattle
Revit MEP Electrical Fundamentals
9.18-19::Portland
Revit Architecture Beyond the Basics
9.23-25::Portland
Revit Architecture Fundamentals
9.30-10.1::San Francisco
Revit MEP Mechanical Fundamentals
9.30 & 10.3::San Francisco
Revit MEP Piping & Plumbing Fundamentals
9.30-10.2::Sacramento
Revit Architecture Fundamentals
Know your software. Sign up now!

September 4, 2014

Solution to a Surface not Syncing in Sheets

The Problem

While on tech support I came across a case where a surface was not automatically updating when opening a sheet drawing. The person had created a design sheet set using the Civil 3D sheet creation function. He then had an issue with the surface contours and labels not automatically syncing when he batch plotted. The plot would be missing the surface contours and labels. He would have to go into each sheet drawing and manually synchronize the reference, which for a few files is fine. When you have upwards of 5 sheets, it is a pain to have to open each drawing and synchronize the surface reference. It’s much easier to just run a batch plot. Unfortunately, it is a known issue with Civil 3D that the Autodesk development team is working on. In the meantime, there is a work around. 


The Solution

What you will need to do is add “SYNCHRONIZEREFERENCES” command to the startup lisp routine (ACADDOC.lsp). The ACADDOC.lsp file is invoked every time a drawing is opened, and thus the synchronize references command will run each time a drawing is opened. The acaddoc.lsp is something that needs to be created because it is not out-of-the box customization. You can use notepad to create this file if it was not already created by your company as part of the software install. It requires lisp coding. I recommend putting the file in the following folder location "C:\Program Files\Autodesk\AutoCAD 2015\Support”. 


Additionally, you cannot run a batch plot in the background for this solution to work. 

Information about Auto-Loading and Running AutoLISP Routines.

More information from Autodesk support. 

For more information on Autodesk products, continue to check out our blog. Additionally, visit our website for information on training and consulting for the various products Ideate services, visit our website.

Kate Ming, P.E.
Ideate AEC Application Specialist


Kate is an Application Specialist at Ideate, Inc. and a Professional Engineer with 6 years of industry experience. At Ideate, Kate provides training, consulting and technical support services for our customers.


September 2, 2014

eLearning - Upcoming Revit and Ideate Software Classes

Join the Ideate Tech Experts for eLearning – live online classes that provide your entire organization with easy access to premium education. 
9.9::Revit 201:
Curtain Walls and Storefronts
9.10::Ideate Software:
Revit Project Management with Ideate BIMLink
9.16::Revit 201:
Rapid Detailing
9.17::Ideate Software:
Revit Auditing with Ideate Explorer
9.19::Revit 201:
Design Options
Each class is designed to give you specific, improved results in a particular topic. You can interact with the instructor right from your own office, while eliminating travel time. Because the class schedule rotates, you can easily select your topics of interest and choose the day which best meets your schedule.

Click here for class descriptions, times and registration link. Questions? Contact education@ideateinc.com

Get It. Know It. Use It.

Classroom Training - Open Revit and Navisworks Classes

Know It. Ideate Training.

Position yourself to land dream projects. Tap the full potential of your software solutions. Increase your facility, fluidity and capability to maximize the value of your precision software tools.
9.15-16::San Francisco
Navisworks Fundamentals (2015)
9.17-18::Seattle
Revit MEP Electrical Fundamentals
9.18-19::Portland
Revit Architecture Beyond the Basics
9.23-25::Portland
Revit Architecture Fundamentals
9.30-10.1::San Francisco
Revit MEP Piping & Plumbing Fundamentals
9.30-10.2::Sacramento
Revit Architecture Fundamentals
Know your software. Sign up now!