Showing posts with label Occupancy Load. Show all posts

June 11, 2015

What Will You Sticky? Plumbing Fixture Requirements with Ideate Sticky for Revit

Plumbing Fixture Requirements with Ideate Sticky for Revit

Due to the nature of Revit’s data structure there are several important code-level tasks that cannot be completed by using a Revit Schedule. For example, a table that requires the comparison of two separate groups of data such as a Gross and Net Area cannot be done with a Revit Schedule. Another example is any data that requires a summary first, and THEN a rounding or a conditional format that is applied only to that summary. Plumbing Fixture Count Requirements are a typical example of this particular condition. 


Most non-residential buildings have code requirements for the number of toilets, etc. based on the area usage within the proposed building. In this simple example we have two floors, each with a few Rooms (Areas can also be used). The Revit schedule is showing the results of a conditional statement applied to each Room or Area per each floor. 

Fig 1: The use of the conditional formula within Revit can lead to inaccurate results.
IF, however, we were to take that data outside of Revit (which we can do with Ideate BIMLink) we can decide WHEN the conditional formula gets applied to the data. If we first add up all the occupants per floor and THEN use the conditional statement on that subtotal, we get VERY different results: now we only need (3) men’s toilets on the first floor instead of (7)! This is saving your building owner serious money!  

Read the rest of this valuable Ideate Sticky for Revit workflow and see the video by Glynnis Patterson on the Ideate Software Blog.

September 23, 2014

Re-examining Revit Based Plumbing Fixture Calculations – Part II

In Part I we discussed the benefits and challenges of the various ways of calculating plumbing fixtures in Revit, including using Ideate BIMLink in recruiting the help of Excel for updating schedules. Now, I will discuss the various formulas required in schedules or family parameters to facilitate the calculation. The formulas are based on the 2012 International Plumbing Code (IPC).

Formula Construction Types

  1. Multiple Codes: The widespread adoption of the IBC/IPC codes in the US provides a baseline for the plumbing fixture calculations, but every jurisdiction chooses to amend or adopt portions of it. To clarify which code is in use for the analysis, build a parameter that identifies the Applicable Code.
  1. Gender split: The general rule is to split the total occupancy in half to determine the number of males and females. The IPC does provide an exception that allows and adjustment of male and female distribution given statistical data on the space usage. The code is silent on how to handle an odd distribution of people. To prevent over-designing the fixture count, it is best to use fractional numbers. The 1’^2 is used to maintain consistency of the units.
    The Male_ratio value is a decimal number from 0 thru 1, requiring user manual input. Build it as a Project parameter of the Area category for visual validation in the Area plan.

    Not all occupancies are required to be segregated by sex. Residential (Group R), Institutional (Group I), and Mercantile (Group M) occupancies with an occupancy less than 50 do not require separated restrooms. In these cases, build a schedule based on the single occupancy load.
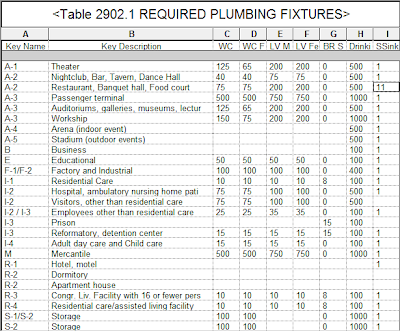
  1. Simple Ratios: Most occupancies use simple ratio factor per IPC Table 2902.1, and simple ratios are easy to do in Revit using calculated values. For example, the ratio for calculating drinking fountains in the B occupancy is 1 per 100.
    Code factors can be retrieved in formulas if you build them via Schedule Key Values, see Fig. 1 below.
  1. Occupancies with graduated ratios: Graduated ratios calculate fixture counts using a ratio for an initial number of occupants and another ratio for the remainder number of occupants. IBC applies a graduated ratio for calculating water closets and lavatories for the B, A-4, and A-5 assemblies. In Revit we can build such a requirement by using conditional formulas. For example, the IPC calculation of Water Closets reads: “1 per 25 for the first 50 occupants and 1 per 50 for remainder exceeding 50”. You can build graduated ratios in Revit using conditional formulas in calculated values:
  1. Calculations based on actual counts: The IPC prescribes for certain occupancies the use of actual counts instead of occupancy factors for fixture calculations, such as Groups I-2, I-3, R-1, R-2 & R-3 which are based on the actual number of rooms, cells, sleeping or dwelling units. For these occupancies, build a project parameter requiring user input. The advantage of a Project Parameter over a calculated value is that the value can be validated visually in the plan via instance parameter of the Area object.
  1. Fixture Substitutions: Urinals and Family/Assisted-Use toilets are typically calculated as substitutions by the IPC. The code allows up to 67% of the male water closets in Assembly and Educational groups to be substituted for Urinals, and up to 50% in all other occupancies. In Revit, the substitutions for each occupancy can be allocated as simple factors.
    Family or assisted-use “Unisex” toilets are a requirement for Assembly and Mercantile occupancy groups. The IPC permits the substitution of one toilet and one lavatory of the fixtures required by males and females but not both. In Revit, the total count of water closets and lavatories would be adjusted by subtracting 1 to either the male or female grand total.
    The problem here is that the plan displays fractional occupancies of the same group because the substitution must be applied to the aggregated fractional sum, making the calculated value invalid.

    For example, two B occupancies areas with required lavatories of 0.9, and 1.1 will need:

    (0.9+1.1)-1=2.0 fixtures
    and not:
    (0.9-1)+(1.1-1)=-0.1+0.1=0 fixtures.

    The same logic applies to Service Sinks, it is typically one unit per occupancy. The calculation of Unisex and Service Sinks cannot be constructed as calculated values when more than one area of the same occupancy are part of the schedule.
Conclusion Use the formulas discussed here to estimate code required Plumbing Fixtures. However, be aware of the limitations. Some formulas like Unisex Fixtures, Service Sinks, and Urinals, must be applied to aggregate fractional sums, and therefore cannot be used in calculated values where the occupancies are fractions. Also note that the construction of summary tables requires manual transcription and cannot be made parametric yet. We will continue searching for innovative ways to overcome these challenges. Questions or Comments? Send me an email, share your experiences with code calculations, and stay tuned to our blog for new solutions.


Cesar Escalante, AIA, LEED AP, CCCA
AEC Solutions Application Specialist

Cesar has a Bachelor of Architecture degree from the University of Central America in El Salvador, a Master of Architecture from the University of Texas, and is a CCCA (Certified Construction Contract Administrator). His experience includes roles as Project Manager and Project Captain at architecture firms in Oakland, California. As a member of the Ideate Tech Expert team, Cesar teaches Revit Architecture Fundamentals and provides client support and consulting. Cesar’s interest in the built environment includes his work as a volunteer for Habitat for Humanity.

Get it. Know it. Use it.


September 10, 2014

Re-examining Revit Based Plumbing Fixture Calculations – Part I

Fig 1: Schedule-based calculation of minimum plumbing fixtures for the Business Group
It may be reasonable to think that Revit could automate the calculation of plumbing fixtures from a given schedule of areas and occupancy loads. Well, think twice. A comprehensive calculation of fixtures in Revit that automates the required number of all types of fixtures (Water Closets, Lavatories, Urinals, Drinking Fountains, Showers, Service Sink, Unisex fixtures) still remains a somewhat elusive exercise. The underlying problem is that the Schedules are meant to quantify the parameter values of Revit project families, and are not really suitable to be used as worksheet for things that are not in the model. This hasn’t stopped us from searching for a way to push Revit to that point, or getting close to a parametric solution.
 

For someone starting to build this type of calculation in Revit, I will review the advantages and limitations of the different approaches used.
 

Before you start building your calculations, keep a few things in mind. First, make sure to keep the units for each calculated value consistent. I recommend building all the parameters of the ‘Number’ type and override the field format to ‘Fixed’ with a 2 decimal rounding increment. This will make the schedule values readable and clean. 

Second, consider recapturing the load data from the Revit occupancy calculations. These calculations are typically based on Revit Area Plans instead of Rooms because Area plans are more suitable to define the boundary limits of both Gross and Net areas as required by code factors. (See Fig. 2.) To maintain consistency of the of the occupancy load, duplicate the schedule of the building load calculation and use those calculated values to get started with your plumbing fixture calculation. More on Occupancy Load Calculations.

Fig 2: IBC Table 1004.12 Maximum Floor Area Allowances per Occupant, built in Revit as Schedule Key of the Area Category

The third consideration is regarding the rounding of values in mixed occupancies. Most codes are silent or generally vague about the rounding rules for aggregated data. In the absence of a clear cut direction, code specialist agree that the best approach is round to the upper integer the aggregated totals of every occupancy instead of the partial subtotals. Rounding up both the occupancy and fixture load in partial subtotals would increase the total count somewhere between 2%-5%, depending of the building size, increasing unnecessarily the building cost. The rounding, they agree, should occur after summing the fractional fixture counts for each occupancy group, keeping the total fixture count as low as permissible. Since Revit cannot round schedule grand totals, the task remains an outstanding feature request. Workarounds require manually rounding up the total and transcribing the result in a dummy key schedule, a process that would be repeated at every program change. 

Fig. 3: The rounding of fixture grand totals remains a long standing feature request.
Current Solutions 

Different solutions have been proposed to tackle the minimum plumbing calculation requirements. Regardless of the method, the actual difficulties become evident when applying different rules for mixed occupancy loads.

  1. Single Schedule: While it is possible to conceive of a single schedule for all of the plumbing calculations, this would be inaccurate and extremely complex to achieve. Since the formulas of calculated values apply to every instance, there is no choice but to build each assembly requirement as a separate schedule column, creating a lot of redundant calculations. For example, each calculation of the Assembly, Business, and Mercantile occupancies will require a separate calculated value for every fixture type. Excluding the values belonging to other occupancies is hard to do using Conditional Formulas. One cannot mix the text-formatted values of the Occupancies (ie B, or M) with any Numerical formulas, unless you assign a numerical value for each group. And even if the conditional formulas end up working, the totals of fixtures per type will be dispersed, turning the effort somewhat futile.
  2. Multiple Schedules by Occupancy Group: Because each occupancy utilizes different plumbing factors and/or load formulas, it may be more reasonable to build a single schedule for every occupancy. Formulas used in calculated values will respond to each occupancy requirement, and the major advantage is that all calculations get updated if the area boundaries change. Still, there will be no way to build a parametric summary of fixture totals. One workaround is to manually add the data into a Summary schedule key. The other alternate is to export each of the schedules as a .TXT file that are opened in Excel and pasted into a single worksheet to calculate totals. The data would require exporting to the schedules at every plan update, and the total need to be manually transposed into a summary schedule.
  3. Excel Calculations: This solution takes all the fixture calculations outside of the Revit environment. Excel certainly provides a wider flexibility to create the fixture count by occupancy group and a summary table. Areas and fixed counts would need to be exported or manually transcribed into an Excel Spreadsheet. The twofold problem is that there is not a way to push the totals back into Revit out of the box, and secondly any change in the area calculation would need to be manually transcribed every time the plan changes. Ideate BIMLink, a Revit add-on that pull and push Revit data with Excel, can certainly facilitate the process of re-importing the data into an existing area schedule or key schedule.
An Excel based script available for free is the Plumbing Fixture calculator posted by Ara Sargsyan. The calculator uses a built-in script in Excel and complies with 2012 IBC & IPC. 
Fig 4: Excel script generated plumbing fixture calculator.
  1. Annotation Family: This is a very elegant solution posted in AUGI forums by user cberteaux371801. Instead of using schedule with calculation values, the plumbing fixture calculations are shifted away from the project and managed as formulas embedded in family instance parameters. The benefit is a visually consistent schedule-like table for every occupancy groups. The user would load in the project an annotation symbol family for each of the occupancies in the building, and the calculation will run based on the occupancy load for the group. This method is almost perfect except that it will not read the occupancy load automatically. Any change in the occupancy loads would need to be transcribed at every change of the program and a summary table with the aggregated totals would still be required. See the original post for more information.
Fig. 5: Annotation Symbol family for the A-1 Occupancy Group. The calculations are driven by the Occupant Load and the Male Ratio which need manual input.
Fig 6: Annotation Symbol family parameter with the formulas for the Assembly Group A-1, complying with IBC & IBC 2012.
  1. API / Scripts?: Can some experimentation with API or Dynamo Scripting provide a better solution? With scripting, it is conceivable to develop a way to extract the occupancy totals and plug them as values into an Annotation Family. In a forthcoming post, I will explore in greater detail the potential of this approach.
Bottom Line: There is not a perfect automated solution yet that provides a parametric calculation of plumbing fixtures, nor a single solution that is universal. While it is possible to push the calculation into schedules and families, every solution requires some level of manual transcription.

If you decide to build your calculation using Families or Schedules in Revit, the code requirement would need to be translated into formulas compatible with Revit. In Part II of this blog post, I will discuss in greater detail the typical formulas used to construct these calculations.


Cesar Escalante, AIA, LEED AP, CCCA
AEC Solutions Application Specialist

Cesar has a Bachelor of Architecture degree from the University of Central America in El Salvador, a Master of Architecture from the University of Texas, and is a CCCA (Certified Construction Contract Administrator). His experience includes roles as Project Manager and Project Captain at architecture firms in Oakland, California. As a member of the Ideate Tech Expert team, Cesar teaches Revit Architecture Fundamentals and provides client support and consulting. Cesar’s interest in the built environment includes his work as a volunteer for Habitat for Humanity.

Get it. Know it. Use it.

July 24, 2014

Occupancy Tags and Macro Fun with Ideate BIMLink

After working hard for years and suffering through internships and hours of mind-numbing detailing tasks you deserve better than to spend time transcribing data from one column to another. And yet…if you are managing tag data for occupancy calculations, you are currently doing this, so stop right now. 

For years Ideate BIMLink has taken on the task of pushing calculated values into shared parameters (something Revit will not do). Now, we are making it easier.  See the video tutorial.


Area and Area Tags showing occupancy loads via Ideate BIMLink and an Excel Macro template.

Existing Ideate BIMLink customers can request the sample content shown in the above video which includes Room and Area Tags, Shared Parameters, and the macro-enabled Excel template. Send your request to support@ideatesoftware.com.


About the Author

Glynnis Patterson, NCARB – Director of Software Development Glynnis is a Registered Architect and has worked within the BIM industry since 1998. A graduate of Carnegie Mellon University, she has worked as an architect, educator and construction site manager. Glynnis is currently the Director of Software Development Services at Ideate, Inc. and continues to work with AEC clients across the nation, developing, and consulting on solutions to Building Information Modeling challenges. In her spare time Glynnis does volunteer work for eclcofnj.org and growitgreenmorristown.org. @GVPinNJ