Showing posts with label BIMLink. Show all posts

August 8, 2016

e-Learning - Upcoming Revit, Civil 3D, InfraWorks, and Ideate Software Classes

Join the Ideate Tech Experts for eLearning – live online classes that provide your entire organization with easy access to premium education.
8.9::Infrastructure 201:
Civil 3D-Settings and Styles
8.11::Ideate Software:
Display Non-BIM Data with
Ideate Sticky
8.12::Revit 201:
Revit Server
8.18::Revit 201:
Creating Curtain Walls, Panels, Storefronts and Mullions
8.25::Ideate Software:
Simplify Revit Model Management with
Ideate BIMLink
8.26::Infrastructure 201:
Intro to InfraWorks
9.1::Ideate Software:
Audit Your Revit Projects with
Ideate Explorer
9.8::Ideate Software:
Streamline Revit MEP Workflows with
Ideate BIMLink
Each class is designed to give you specific, improved results in a particular topic. You can interact with the instructor right from your own office, while eliminating travel time. Because the class schedule rotates, you can easily select your topics of interest and choose the day which best meets your schedule.

Click here for class descriptions, times and registration link. Questions? Contact education@ideateinc.com.

Get It. Know It. Use It.

October 15, 2015

Color Elements by Parameter Quickly Using Ideate BIMLink

I was recently presented with an Ideate BIMLink tech support case in which a customer was interested in overriding the surface pattern and color of Revit model elements that he needed to edit in the near-future. After running through their Structural Analysis program, he identified elements that needed to be edited or swapped out, and then wanted to change the color through Excel and have that color change the surface patterns of those elements when imported back into Revit.

One of the solutions that we provided him was to create a custom Yes/No parameter and add that parameter to the Structural categories (or most categories for that matter) in Revit. This parameter was called EDIT Element Reminder and since it was a Yes/No parameter, it produced a checkbox. A check in the box would then remind the user that he or she needed to edit the element at some point.

In addition to creating the checkbox, we also recommended that he create a Multi-Category schedule for most of the Revit categories and then add all of the Parameters that they want to see and export. Included in these schedules was the custom EDIT Element Reminder Yes/No Parameter, which also has a conditional format parameter to fill the cell color in Red when set to Yes. From there, he could then export the schedule using Ideate BIMLink, run his analysis tools, identify the elements that required editing and then change the status in Excel. From there, that Excel file can be imported, which will then change the status of those elements. In turn, those elements will be flagged in the schedule, alerting the user to Edit the element.

In addition to creating the parameters and schedules, we also recommend that they create custom 3D Coordination Views that only displayed the categories of elements that they were interested in editing. To that view, we added a Filter that would color the elements that required editing, which uses the EDIT Element Reminder parameter as the driving force behind the color change. Elements that did not require editing would then half tone, allowing the elements that needed editing to stand out.

Using custom parameters, filters, and Ideate BIMLink, you can quickly add a status to Revit elements as a reminder to add or edit information for each of the elements that you choose to edit. In the example shown, all elements in red need to be edited, while the half-toned elements do not.


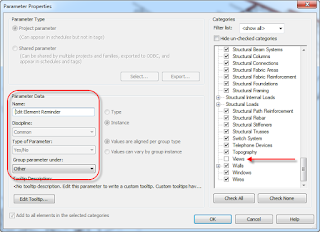
In order to add the reminder, we are first going to start off by adding some Yes/No Project Parameters and then apply them to categories that you want to remind yourself to Edit. For this example, we are going to create a custom Yes/No parameter for all Instance based Revit categories. You may want to consider unchecking views since they are not elements.


Here is the example of the Edit Element Reminder Project Parameter that we created for the selected Revit categories (from the previous image).


Once the parameters have been created, we went ahead and created Coordination Views that isolated the element categories that we wanted to have a better look at. We also created separate schedules for categories we wanted to add reminders to. In this example, we created a
Multi-Category Schedule, which schedules most Revit categories (system families, masses, etc. are NOT included in Multi-Category Schedules) and then created schedules for other categories that are not included in a Multi-Category Schedule.


Here is an example of a Multi-Category Schedule with the EDIT Element Reminder parameter added. Once we determine which elements we need to edit (say we did a Structural Analysis and determined that we need to edit the properties of certain structural elements), we can use Excel and BIMLink to quickly change the statuses of elements and remind ourselves to review the elements at a later time. Keep in mind that we can add as many Parameters that we wish to, which will help us to make informed decisions.


In addition to creating the custom schedules with our newly created parameter(s), we also added a Conditional Format to the Edit Element Reminder Parameter. In this example, if we place a checkbox in the Edit Element Reminder field, it will color the schedule cell Red to remind us that we need to make changes to that element(s).


Once the parameters, views, and schedules have been created, we are ready to export our Schedules using Ideate BIMLink. In this example, we are exporting our data using the BIMLink Multi-Category option. Unlink the Revit Multi-Category option, Ideate BIMLink’s Multi-Category is more robust and includes many more Revit categories, allowing you to edit one Excel spreadsheet instead of many. After the export, we can use Excel to change the EDIT Element Reminder statuses, which will remind us which elements to edit in the future.
 

Before exporting the BIMLink Multi-Category link, it is advised that you visit the Filters tab and filter the list by the Edit Element Reminder Parameter whose condition “is editable”. This will ensure that your Excel file only shows categories that have the Edit Element Reminder parameter applied to it. By utilizing this method, you will omit categories such as views, annotations, etc., which do not have the Edit Element Reminder parameter applied to them.


Once the Export is complete, you are ready to edit your parameters. In this example, we are interested in changing the status of the Edit Element Reminder Yes/No parameter. Perhaps we ran a structural analysis or had a client meeting and determined that we need to make changes to particular elements in the Revit model. If this is a case, we will add a reminder to edit those elements. In addition, we can add some comments and explain why we need to edit those elements. For Yes/No parameters, you choices are TRUE (Yes) or FALSE (No). When imported back into Revit using Ideate BIMLink, TRUE values will result in a checkmark and FALSE values will not.


Once the Excel file has been edited, we can then import the Excel document back into Revit using Ideate BIMLink, which will then update the Revit model and corresponding schedules. In the example show here, we have several structural columns that we added reminders to, which are flagged with checkboxes and a red color fill. We also added some comments, which reminds us why we need to make the change.


If you are interested in applying color to the elements that you need to edit, you could create some filters that represent the Yes and/or No statuses and then apply those filters to the view that you want to see the color in. For this example, we created filters for the YES and NO values. We will add these filters to the 3D color view and color each of the elements that have a YES status and Halftone each of the elements that have a NO status. By utilizing the YES and the NO filters, the color will pop out, and the elements that we are not interested in editing will fade out in the background.


Once the filters have been created, you can then go to the view that you want to override with color and add those filters to the Filters tab of the Visibility/Graphics dialogue box. In this example, we added the YES filter and applied a red color and solid fill pattern to the Surface Patterns of the elements that we want to edit, and then for all of the NO’s we utilized the halftone option. 


With all of the pieces in place, we have created a view that clearly distinguishes the elements that need editing (colored elements) and the ones that do not (halftoned). After you edit each element (swap out, change properties, etc), you can then select the element and remove the checkbox from the EDIT Element Reminder parameter in the Properties Dialogue Box (better yet, you can re-export the schedule using Ideate BIMLink and set all the values to FALSE, which will indicate that you edited each element). After doing so, those elements will then turn to halftone, indicating that they no longer require editing.


For more information on training and consulting for the various products Ideate services, visit our website at
www.ideateinc.com


Sash Kazeminejad

AEC Senior Application Specialist

Sash brings proficiency in Autodesk solutions including AutoCAD and Revit Architecture to Ideate customers. His industry experience includes project management, BIM Management, and design for Architectural firms in California, Montana and Oregon. He is LEED accredited professional and is on track to achieve California licensure with Oregon to follow. In his academic life, Sash was awarded a variety of college scholarships, earned a BA in Environmental Design, a MA in Architecture from Montana State University (MSU) and taught Building Information Modeling courses at MSU Gallatin College. As a Revit Architecture Autodesk Certified Instructor, Sash provides Revit Architecture training and support for AEC firms.@sashpdx 

March 30, 2015

eLearning - Upcoming Revit and Ideate Software Classes


Join the Ideate Tech Experts for eLearning – live online classes that provide your entire organization with easy access to premium education. 
4.2::Revit 201:
Making Titleblocks and Drawing Lists
4.3::Revit 201:
Residential Construction in Revit Architecture
4.7::Ideate Software:
Ideate BIMLink for Revit MEP Projects
4.8:Ideate Software:
Revit Project Management with Ideate BIMLink
4.14::Revit 201:
View Properties - Controlling Visibility
4.21::Revit 201: 
Stairs and Railings in Revit Architecture
4.22::Ideate Software:
Introduction to Ideate Sticky
4.23::Ideate Software:
Revit Auditing with Ideate Explorer for Revit
Each class is designed to give you specific, improved results in a particular topic. You can interact with the instructor right from your own office, while eliminating travel time. Because the class schedule rotates, you can easily select your topics of interest and choose the day which best meets your schedule.

Click here for class descriptions, times and registration link. Questions? Contact education@ideateinc.com

Get It. Know It. Use It.

March 4, 2015

Events: Top 5 Ways to Promote BIM Office Education

Revit User Groups - Having a hard time getting your office to adopt, or effectively work with BIM? Let Laura Kay Smith show you some of the ways she has discovered to promote BIM in her office.

Pre-Presentation Lunch & Networking
            ...Provided by Ideate...
            11:30 AM - 12:00 PM


March 10th :: 
Top 5 Ways to Promote
BIM Office Education
12:00 PM - 1:00 PM

AIA CENTRAL VALLEY
1400 S Street
Suite 100
Sacramento, CA 95814

Register Here!


March 11th :: 
Top 5 Ways to Promote
BIM Office Education
12:00 PM - 1:00 PM

AIA SAN FRANCISCO
130 Sutter Street
Suite 600
San Francisco, CA 94104

Register Here!

March 12th :: 
Top 5 Ways to Promote
BIM Office Education
12:00 PM - 1:00 PM

AIA EAST BAY
1405 Clay Street
Oakland, CA 94612

Register Here!

About the Presenter

Laura Kay Smith
Senior BIM Specialist

Kasian Architecture Interior Design and Planning, LTD
Originally from Portland, Oregon, Laura Kay Smith is the Senior BIM Specialist at Kasian Architecture Interior Design and Planning, LTD. based in Vancouver BC Canada. Laura has been in the Technology management side of Architecture for 20 years, both as a business consultant and in–house expert, developing and helping firms use and harness the Technology to create better design. Regardless the role or firm, Laura has been a leader at bringing new ideas and helping each firm work towards the future. For the past four years, Laura has contributed to Kasian’s transformation as a fully integrated BIM focused firm. Laura’s passion for BIM is evident. As the author of a blog, BIMFreak, Laura provides a valuable resource for implementing and starting the BIM transition in your firm.

Visit us on the web for more on Ideate, Inc.


March 3, 2015

Richard Taylor Joins Ideate Software as Technical Evangelist

SAN FRANCISCO, California, 03/3/2015–Ideate, Inc., an Autodesk Platinum Value Added Reseller, today announced that Richard Taylor has joined Ideate Software as a Technical Evangelist. Richard comes to Ideate Software after being employed by Autodesk for more than a decade, his most recent position there was as Revit Platform Feature Product Manager. His vast expertise in Building Information Modeling (BIM) and 3D visualization software, combined with his extensive knowledge and experience in the Architecture, Engineering and Construction (AEC) industries will help to expand the Ideate Software business and its BIM-focused solutions.

Ideate Software is a set of far-reaching Building Information Modeling (BIM) data management tools that help the Revit community clean up models, delete problem items, analyze files quickly, improve speed and accuracy in data flow, increase collaboration and overcome repeated workflow interruptions.

All Ideate Software, from the first release for Revit 2011, undergoes rigorous testing to ensure that it is robust and stable, and all Ideate Software BIM data management solutions updates are meaningful and frequent.

Ideate BIMLink lets users pull information from a Revit file into user-friendly Microsoft Excel and push volumes of precise, consequential BIM data from Excel into Revit with speed, ease and accuracy. Ideate Explorer for Revit allows users to extensively manage Revit models. Ideate Sticky for Revit combines the ease and flexibility of Excel spreadsheet editing with the convenience of a sticky note.

Bob Palioca, President of Ideate, says of the addition to the Ideate Software team, “Richard Taylor brings significant experience as a facilitator and presenter in the global AEC software and design industry. His notable ability to demonstrate and teach sophisticated technical software solutions in a highly relatable way across many different disciplines, cultures, and levels of experience makes him a valued technical evangelist for Ideate Software. We are delighted to welcome him.”

About Ideate, Inc.
Ideate, Inc. is a leading Autodesk Authorized Developer with 25+ years’ experience in software development and specific focus on Building Information Modeling (BIM). As an Autodesk solutions provider, Ideate has offered quality software, training, support and custom consulting services to the architectural, engineering and construction (AEC) industries since 1992. Headquartered in San Francisco, California and operating Autodesk Authorized Training Centers (ATCs) in California, Oregon and Washington, Ideate is recognized as an Autodesk Platinum Partner for Architecture, Engineering and Construction, Autodesk’s highest level of authorization.

About Ideate Software
Ideate Software allows Revit users to have unprecedented control over their data. Ideate BIMLink, Ideate Explorer for Revit, and Ideate Sticky were all developed to solve persistent problems in Architecture, Engineering, and Construction (AEC) workflows. Ideate Software solutions enable Revit users to save time, increase accuracy, improve project deliverables, and elevate design.

Autodesk and ATC are registered trademarks of Autodesk, Inc. and/or its subsidiaries and/or affiliates, in the USA and/or other countries. All other brand names, product names, or trademarks belong to their respective holders.

January 28, 2015

Events: Applying BIM to a Historic Structure

Revit User Groups - Join us in February to explore the San Francisco War Memorial Veterans Building. Built in 1932,  it is one of the last major American Buildings constructed in the Beaux–Arts style. Standing across the street from the City Hall, it is part of a state and local historic district, and is a designated local historic landmark. In 2011, the City of San Francisco initiated a $96 million renovation project, driven by the need for a seismic upgrade. The project team used Revit for coordination purposes during design. The contractor used both Navisworks and Tekla for coordination during construction. Major structural work is now complete, and the project is on schedule to open later this year. This presentation will focus on the costs and benefits of applying BIM to a historic structure, as well as the unique challenges the team faced during construction.

Pre-Presentation Lunch & Networking
          ...Provided by Ideate...
          11:30 AM - 12:00 PM

February 10 :: Applying BIM to a Historic Structure
12:00 PM - 1:00 PM

AIA Central Valley
1400 S Street
Suite 100
Sacramento, CA 95814

Register Now!

February 11 :: Applying BIM to a Historic Structure
12:00 PM - 1:00 PM

AIA SAN FRANCISCO
130 Sutter Street
Suite 600
San Francisco, CA 94104

Register Now!

February 17 :: Applying BIM to a Historic Structure
12:00 PM - 1:00 PM

AIA East Bay
1405 Clay Street
Oakland, CA 94612

Register Now!


About the Presenter

Benjamin Mohr
Senior Structural Engineer – SGH

Benjamin Mohr is a senior structural engineer at SGH. He has over nine years of structural design experience, and specializes in seismic retrofits. He has masters degrees in both architecture and structural engineering from Virginia Polytechnic Institute and State University. Benjamin participated in peer review committees for two–rise projects, and is an active member in the Structural Engineers Association of Northern California. He spent three years working on the expansion and retrofit of the San Francisco State University Library, which won both state and national awards for engineering excellence.


January 21, 2015

Events: Pre–design Revit Roundtable Discussion

Revit User Groups - Happy New Year from Ideate! We are kicking off the 2015 year with a moderated discussion on Revit and pre-design tasks. Whether the challenge is architectural programming, space planning, or other conceptual design tasks, most would argue that Revit is not an ideal pre-design tool. With each company approaching this topic differently, we want to share each other's ideas and experiences.

January 26 :: Pre–design Revit Roundtable Discussion 
1:30 PM - 3:30 PM

AIA SAN FRANCISCO
130 Sutter Street
Suite 600
San Francisco, CA 94104

Register Here

January 27 :: Pre–design Revit Roundtable Discussion 
11:30 AM - 1:30 PM

AIA East Bay
1405 Clay Street
Oakland, CA 94612

Register Here

Come prepared to discuss these questions:
  • Are you actively using Revit as part of your pre-design process? If so, which elements are being used and what are the pros and cons?
  • What are some ways architects might use Rooms, Areas, Spaces, or Masses?
  • Ways engineers might use Masses or other elements?
  • Which third party tools are you using to manage pre-design process?
  • Regardless of your pre-design solution, what are the challenges in taking that information and moving it forward into the schematic design

Sash Kazeminejad, ACI, LEED AP
AEC Senior Application Specialist
Sash brings proficiency in Autodesk solutions including AutoCAD and Revit Architecture to Ideate customers. His industry experience includes project management, BIM Management, and design for Architectural firms in California, Montana and Oregon. He is LEED accredited professional and is on track to achieve California licensure with Oregon to follow. In his academic life, Sash was awarded a variety of college scholarships, earned a BA in Environmental Design, a MA in Architecture from Montana State University (MSU) and taught Building Information Modeling courses at MSU Gallatin College. As a Revit Architecture Autodesk Certified Instructor, Sash provides Revit Architecture training and support for AEC firms. @sashpdx

Get it. Know it. Use it.


January 7, 2015

Carriage Returns in REVIT Schedules

The term Carriage Return was originally coined after the lever mechanism used by old typewriters to return to the left and advance the paper to the next line.  In modern times, the concept seems to be used interchangeable between Line feed (LF) -the ASCII code (10) that move the cursor or a printer down one line (LF button in dot-matrix printers), followed by paragraph break or hard return.in current word-processing packages. Regardless of the terminology variation, when editing text notes or schedules in Revit you often need to add carriage returns. This is easily done by clicking the ENTER key.

The ENTER key breaks a text note.

Carriage returns in Schedules are a different story. Pressing the ENTER key while editing a cell in schedule would not create a carriage return, but close the edit mode of a cell. The widely known workaround is using the shortcut CTRL+ ENTER.
The CTRL + ENTER key combination would create a carriage return.

While CTRL+ENTER does work, editing the cell  to add the desire break is really cumbersome.  The schedule view would never display stacked lines, only single lines. The up and down arrow keys won’t jump the cursor to the paragraphs below, nor the PgDN or PgUP.  The only way to make edits across multiple paragraphs is by dragging the cursor to the right or left and clicking the forward or backspace as many times as needed to get to the appropriate character.

Dragging a selection of text to the cell border would move the cell string to a different paragraph line.
The drop down arrow selector on right side of the cell will reassign the text to either one of the paragraph and delete the rest. CTRL+ENTER would assign for each paragraph an independent choice. Do not use or you will have to retype the entire text note.

Do not use the drop down arrow selector in a multi-paragraph note. It will keep a single paragraph and remove the rest.
Troubling as it is, while editing multiline cells is possible, you cannot add an empty line at the end of the paragraph. The CTRL + ENTER combination at the end of a paragraph in a cell will not create a carriage return, a major formatting drawback and a long standing feature request… or is not?

We researched the issue and found a workaround reported by some users who were able to add an empty line by adding the ASCIII ‘empty space character’ code at the end of carriage return. (CTRL+ENTER followed by ALT+0160).  I was, for some reason, unsuccessful to make it work, at least on my installed RAC 2015 R2 version.

But one way I make this work (or faking it to work?) is by adding a parameter that creates an invisible narrow column with enough character values to force the return.  Here is the workaround:  I created a new parameter of the integer type, added a number of characters equal to the number of lines plus one, and reduce the column width to a single character.

Create a blank space at the end of a cell, add a parameter that create a narrow invisible column with a number of characters equal the number of lines plus one, and change the column font color to RGB 254-254-254.
RGB Color 254,254,254 will never print.

To make the column invisible, change the font color. Changing to color to true white directs REVIT to display it in Black, therefore, change color to RGB 254,254,254 which is technically a grey color so light that it would never print.  


For lengthy schedules with various paragraph lines per cell, this method would be somewhat tedious. The task, though, would be far easier if we could make the edits in Excel. Using Ideate BIMLink, you can export the data to an Excel Spreadsheets and add the ‘invisible’ characters there.
Edit all your keynotes descriptions in Excel, making sure you add manually the ‘carriage return’ where needed. In Excel, the carriage return is added manually using the ALT+ENTER combination.

The idea is to create populate the ‘invisible parameter’ with a total number of characters that equal to the amount of line spaces in a cell plus one. 

The process can be automatized using Excel formulas.  The formula parameters is explained below:
=LEN(C2)
Counts the total number of characters in a cell
=CHAR (10)
The Excel function of the ‘line feed’ (carriage return) symbol
=SUBSTITUTE(C2,CHAR(10),"")
Delete all the ‘line feed’ symbols in a cell (substitute them by ‘nothing’)
=LEN(C2)-LEN(SUBSTITUTE(C2,CHAR(10),""))
Count the total number of ‘line feed’ symbols in a cell

The final formula to create a value that equal the amount of line spaces plus one is as follows:

=POWER(10,LEN(C2)-LEN(SUBSTITUTE(C2,CHAR(10),"")))*10

-If the number of line spaces in a cell is 2 = 100
- If the number of line spaces in a cell is 3= 1000
- If the number of line spaces in a cell is 4 = 10000… etc.

The data can then be reimported into Revit, forcing the ‘narrow’ column to wrap and giving you that magical carriage return space.

Watch a video on Carriage Returns on YouTube.


Cesar Escalante, AIA, LEED AP, CCCA
AEC Solutions Application Specialist

Cesar has a Bachelor of Architecture degree from the University of Central America in El Salvador, a Master of Architecture from the University of Texas, and is a CCCA (Certified Construction Contract Administrator). His experience includes roles as Project Manager and Project Captain at architecture firms in Oakland, California. As a member of the Ideate Tech Expert team, Cesar teaches Revit Architecture Fundamentals and provides client support and consulting. Cesar’s interest in the built environment includes his work as a volunteer for Habitat for Humanity.

Get it. Know it. Use it.


November 18, 2014

Going from the Field into Revit via Ideate BIMLink

Many Ideate BIMLink customers are leveraging coordinate data in new and exciting ways. In an earlier blog post we wrote about taking Revit data from the BIM and into the field and now, with the newest version of Ideate BIMLink (for both 2014 and 2015), we have added the ability to go from the field and into the Revit model. This means that the surveyor can go out and locate the actual spots for footings, columns, etc., and import that via Ideate BIMLink to update the model information to match the as-built surveyed data. 

‘Out-of-the-box’ content to support going between the field and the Revit model with coordinate data.
The “Generic_Model-Survey_Pts” link is just one of the out-of the box samples that ships with Ideate BIMLink and can be found within the Construction Links folder as shown. This link supports a workflow which exploits the new ability within Ideate BIMLink to relocate Generic Model and Mass elements by directly editing the XYZ values. 

Use Ideate BIMLink to edit the XYZ values of Generic Model instances to locate survey points within your Revit model:


Work-plane based Generic Model elements have editable XYZ values.
This process is documented within the online help topic. Let us know what you think AND also how else you’ll be leveraging your Building Information Model data with this new functionality! 

This post was originally published on the Ideate Software Blog.

About the Author

Glynnis Patterson, NCARB – Director of Software Development Glynnis is a Registered Architect and has worked within the BIM industry since 1998. A graduate of Carnegie Mellon University, she has worked as an architect, educator and construction site manager. Glynnis is currently the Director of Software Development Services at Ideate, Inc. and continues to work with AEC clients worldwide, developing, and consulting on solutions to Building Information Modeling challenges. In her spare time Glynnis does volunteer work for eclcofnj.org and growitgreenmorristown.org. @GVPinNJ