
To begin open a model that you would like to perform this study on:
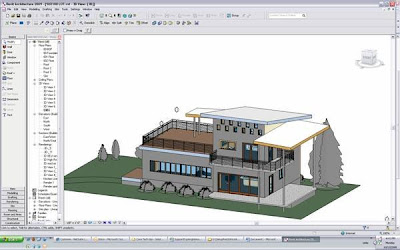 (Ensure your building is oriented correctly)
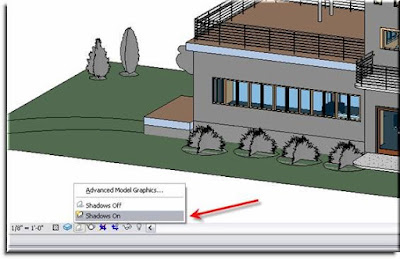 Next, turn your shadows [ON] at the Visual Graphics Control Bar:When you do this you will automatically notice that your building has an accurate representation of where the sun is in the sky and the model reflects this. While this is helpful, it currently doesn’t tell us
1.) Where we are
2.) What time of year it is
3.) What time of day it is
This of course is easily rectified. Once again go to down the Shadows Toggle button and Choose “Advanced Model Graphics”. You will get a dialogue box like the one below. Here adjustments can be made to the basic visual settings of how your shadows are displayed in the current 3D view. (Keep in mind that enabling shadows does NOT change this setting globally.)
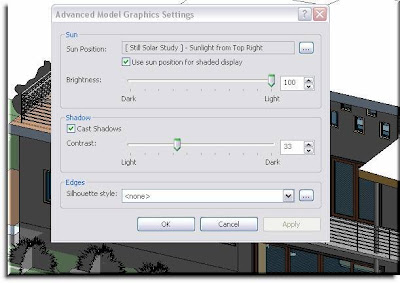 By default your Shadow Display will be set to something Generic like “Sunlight from Top Right”. To designate a specific city or indicate geographic coordinates select the small radio button next to Sun Position parameter "...".
 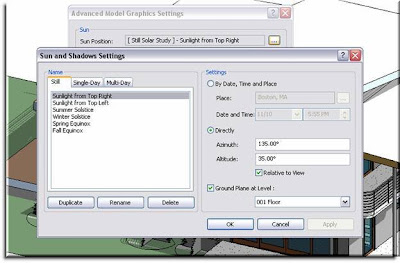 You should then see the “Sun and Shadows Settings” dialogue box. On the left side you have 3 tabs that give you the option to create one of three types of solar studies.
1.) Still: a single glimpse of your model at a certain time, day, and place/sun angle.
2.) Single-Day: An animated study of the suns travel across the sky on a given date, in a particular location
3.) Multi-Day: An animated study of the suns path at a specific time of day in a specific location over a designated period of time.
On the right side your options will change dependent upon which type of Solar Study you would like to create. For this example we’ll do a Single-Day study of this home on May 4th, 2009, if it was built in Albuquerque, New Mexico.
1.) Select the Single-Day tab
2.) Choose Duplicate
3.) Name new study: May 4th, 2009 – Albuquerque, NM, USA
4.) Select OK
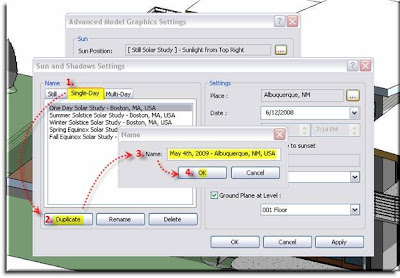 The new location will then be added to your list of single day locations. From here you will need to change the Place, Date, Time Range, and Interval which can be adjusted on the right portion of the dialogue box. (*The “Place” parameter does not automatically update when you create a new location. Be sure to make sure your selected location corresponds with your Place parameter before going forward.)
Selecting a Place is self explanatory though within this dialogue box it gives you the option to enter Lat. and Long. coordinates.
Now once everything is set up to you specifications, choose Apply and OK.
 This will bring you back to your Advanced Model Graphics dialogue where you can make any additional adjustments to your visual appearance. Apply these and press OK. (*A benefit of the Apply button, as in Windows, makes the changes but, doesn’t shut the dialogue box so if you don’t like the way it looks you can change it again without having to recall the previous dialogue.)
You may notice a slight shift in what the drawing looks like depending upon how much you adjusted the contrast or brightness.
Now, in order to see this you solar study it is as simple as returning back to the Shadow Toggle button. Here you will find a new option that says, “Preview Solar Study”. Select this and you will notice a new options bar tool.
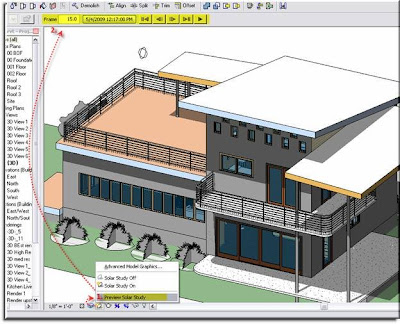 You will notice that this new options bar looks a lot like a Start, Stop, Play interface and that is essentially what it is. Here you can play the Solar Study, cycle through frame by frame, or skip from start to finish. The box next to the frame box displays the current settings and that you currently see on screen.
Go ahead and press play to see the results of your work!
 Once you have gotten your Study to look as you wish you can export it as an .avi file. Simply go to File>Export>Animated Solar Study and adjust the settings to reflect the Length, Size, and Style of the .avi.
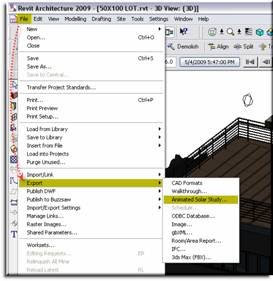
>>
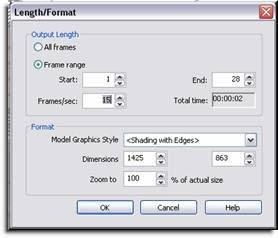
Designate a location that you will remember and let Revit do its thing. The .avi will appear where ever you said for it to be saved and you can open it after it renders the animation.
- Daniel Childs
Ideate Inc