Showing posts with label Fabrication. Show all posts

September 1, 2016

Revit 2017: Filling Gaps in a Revit Fabrication Model

Fabrication detailing in Revit 2017 supports different MEP detailing workflows. In this post, I'll provide a brief rundown for each.

For each fabrication model you must specify a fabrication configuration and load services. You can then place parts to create a detailed fabrication model in Revit, or convert an existing Revit model with generic duct, pipe, and electrical containment parts to a model that uses fabrication parts.

Continue to add fabrication parts and modify the elements in the model as needed. For all those new to the feature this can be found on the Systems tab > Fabrication Part:

Content: 

Download sample fabrication configurations for use with the MEP features of Revit. The sample fabrication configurations contain generic US Imperial and UK Metric content.

Download the Imperial and Metric sample configurations

  1. Click the file names: www.autodesk.com/revit-2017-mep-fab-sample-content-imperial and www.autodesk.com/revit-2017-mep-fab-sample-content-metric.
  2.  
  3. Open the files. The files are installed to:
  • C:/Users/Public/Documents/Autodesk/Fabrication /Revit MEP Imperial Content/Vx.xx
  • C:/Users/Public/Documents/Autodesk/Fabrication /Revit MEP Metric Content/Vx.xx
However, to access and use a full set of real-world content, I would suggest an installation of any of the Autodesk Fabrication products:
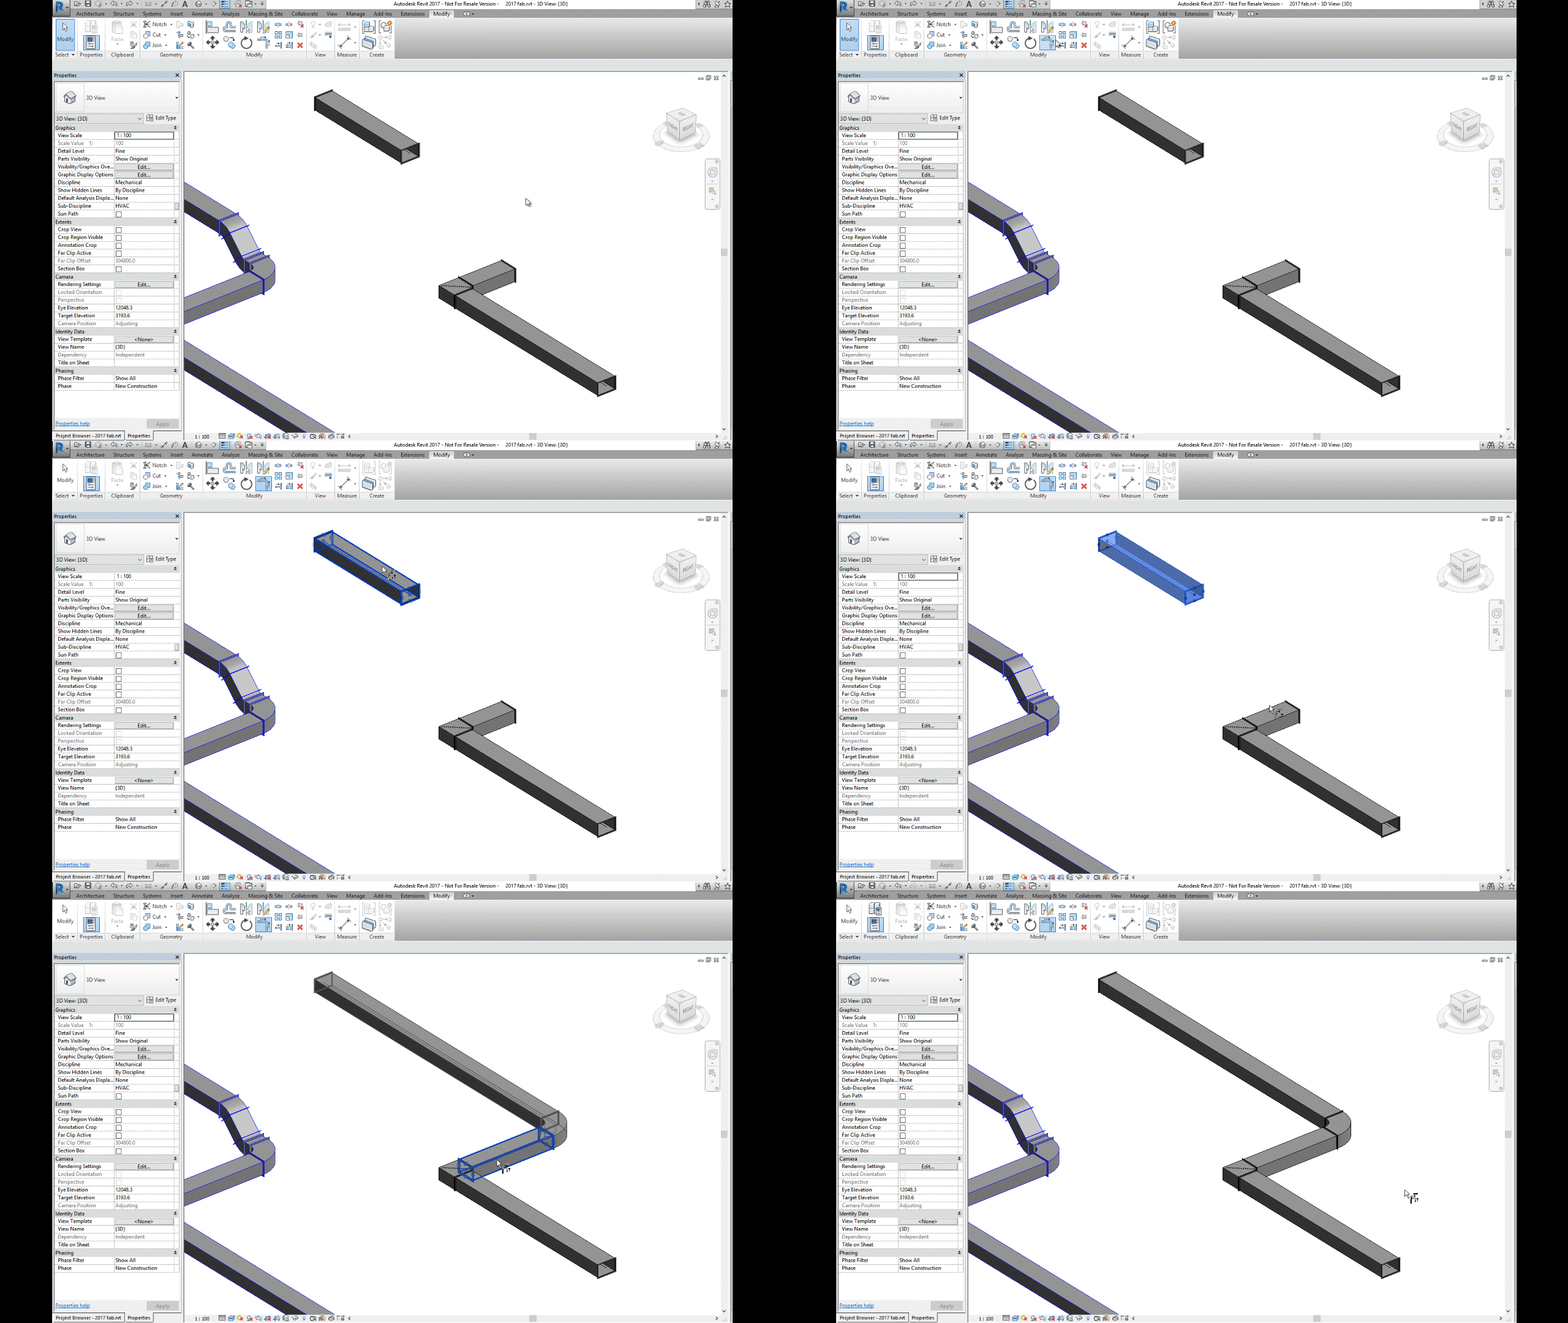
Trim and Extend:

Use the Trim/Extend tool to fill a gap between two straights, For example, when connecting a duct branch to a main or pipework to a header:
Quick Connect:

Use the Quick Connect tool to fill a gap between a fitting and another straight where no additional fittings are needed. 


Please note: the Quick Connect command is available only when a fitting is selected. The command is disabled when a straight is selected. You can use this tool to drag the connector onto another part to connect them:

Route & Fill:

Use the Route and Fill tool to add parts between two open connectors in a faster, more efficient way than placing parts one-by-one. The Route and Fill tool provides one or more solution depending on the service. You can narrow the number of solutions by filtering the fittings used, switch direction of the route, and even filter the solutions to force it to use certain parts:

Per the Autodesk help file, one thing to remember with this feature is that “A route must exist in a single plane. Solutions that require two planes or three bends are not supported.” This means varying height connections that also require bends will not automatically connect. It may be quicker using the “Design to Fabrication” feature for these situations.

Design to Fabrication:

Use the Design to Fabrication tool to convert a design model with Revit elements to a fabrication model with LOD 400 fabrication parts.

You can convert selected parts, or an entire duct or pipe network. The Design to Fabrication tools provide a more efficient workflow, since the fabrication model does not need to be redrawn from scratch. The result of the conversion is based on the design line algorithm used by the Autodesk Fabrication products, and uses the same content available in the Autodesk Fabrication products:

It's important to note, this is a one-way process; once the Revit MEP Design has been converted to Fabrication Parts, it cannot be reversed. I would suggest using a copy of the MEP Design to convert, as this gives us the benefit of linking the projects for comparison.

Swap Parts:


In 2017 we now have the ability to swap Fabrication parts in the same way as Revit Families:

Optimize Lengths:

This feature allows you to optimize the straight lengths of generic ductwork by adding, removing, or modifying lengths of straight segments.


Please Note: If a straight is pinned, or part of a group, it will not be optimized.

To go in-depth with each of these features, check out my videos in the Revit Architecture, Revit MEP and Revit Structure 2017 playlist on Ideate Inc.'s YouTube Chanel.

Thank you for reading. For more information on the software solutions, training and consulting Ideate provides, please visit the Ideate Inc. website.

Senior Application Specialist MEP/AEC Solutions
Bill has over 25 years experience in applying MEP & AEC design solutions for large commercial companies, this has led to actively develop Autodesk® Revit® implementation strategies, techniques, and procedures for architectural and MEP companies. He has worked for TEECOM Design Group, GTE/GTEL, Greg LeDoux and Associates, and Scottish Power in England. Bill is an Autodesk MEP Implementation Certified Expert, and has been the Lead Designer for several multimillion dollar communication sites which have included structural, electrical, HVAC, conduit, cable plans and equipment layouts. He graduated from the Pasadena Institute of Technology and has a Sustainable Design Certification from the University of California at Berkeley.

August 11, 2016

Revit 2017: Design to Fabrication

It's hard to believe it's now August, and we still haven't covered all of the powerful features in Revit 2017!

In this post, we will review the new Design to Fabrication feature

Revit MEP designers can now “convert generic Revit MEP elements to Fabrication Model” with LOD 400 detail Fabrication Parts. This means you can convert selected parts or an entire duct or pipe network.

The Design to Fabrication tools provide a more efficient workflow, since the fabrication model does not need to be redrawn from scratch.

Here is a short video demonstrating how to use the Route and Fill with Revit Fabrication Parts. 

Thank you for reading. For more information on the software solutions, training and consulting Ideate provides, please visit the Ideate Inc. website.

Senior Application Specialist MEP/AEC Solutions
Bill has over 25 years experience in applying MEP & AEC design solutions for large commercial companies, this has led to actively develop Autodesk® Revit® implementation strategies, techniques, and procedures for architectural and MEP companies. He has worked for TEECOM Design Group, GTE/GTEL, Greg LeDoux and Associates, and Scottish Power in England. Bill is an Autodesk MEP Implementation Certified Expert, and has been the Lead Designer for several multimillion dollar communication sites which have included structural, electrical, HVAC, conduit, cable plans and equipment layouts. He graduated from the Pasadena Institute of Technology and has a Sustainable Design Certification from the University of California at Berkeley.

August 21, 2015

Revit MEP 2016 Pipe Layout for Fabrication


Autodesk Revit 2016 Revit now allows you to add fabrication level detail to pipe systems using content from Autodesk Fabrication products.

Procured parts, such as pipe fittings are constrained to realistic dimensions based on their content definitions known as product listed parts, and represent components that may be purchased.

When you add a coupling like a flange at the end of a pipe for a welded pipe system, Revit MEP 2016 will automatically add another flange when you add a fitting like an elbow.

Flanges are automatically added when a flanged valve is inserted.  When adding a pipe to the valve, a flange will be added to the end to properly connect to the valve.

Use Revit tools like copy to quickly and easily add similar components with the ability to rotate them upon placement or after.  After placing a straight segment, you can use the Properties palette to change the length of pipe. 

The fabrication content also includes hangers for pipe that will automatically size and extend to supporting elements to linked models.  When used the hangers extend to the beam in the linked structural model.  Adjusting the pipe elevation will automatically adjust the rod length.

 
...View video below...


For more information on training and consulting for the various products Ideate services, visit our website at www.ideateinc.com


Bill Johnson

Ideate Senior Application Specialist MEP/AEC Solutions

Bill has over 25 years experience in applying MEP & AEC design solutions for large commercial companies, this has led to actively develop Autodesk® Revit® implementation strategies, techniques, and procedures for architectural and MEP companies. He has worked for TEECOM Design Group, GTE/GTEL, Greg LeDoux and Associates, and Scottish Power in England. Bill is an Autodesk MEP Implementation Certified Expert, and has been the Lead Designer for several multimillion dollar communication sites which have included structural, electrical, HVAC, conduit, cable plans and equipment layouts. He graduated from the Pasadena Institute of Technology and has a Sustainable Design Certification from the University of California at Berkeley.

Get it. Know it. Use it.

August 6, 2015

Revit MEP 2016 – Part Optimization for Fabrication


Autodesk Revit 2016 uses the Autodesk Fabrication MEP configuration data defined in the *.ITM template parts in the current version of Autodesk Fabrication products CADmep and ESTmep.

The Duct Part Editor enables you more detailed control over the duct components and allows you to define detailed dimensions of the part and its connectors.

When placing fabrication parts in Revit 2016, the specifications defined in the Fabrication Configuration define what duct materials may be used.


The specification also controls material gauge (weight), the standard segment lengths, and the connectors applied to the fitting ends.

The *.ITM Template based parts enable detailed control of dimensional values.  The connector settings provide you with the ability to configure end conditions.

 
...View Video Below...


For more information on training and consulting for the various products Ideate services, visit our website at www.ideateinc.com


Bill Johnson

Ideate Senior Application Specialist MEP/AEC Solutions

Bill has over 25 years experience in applying MEP & AEC design solutions for large commercial companies, this has led to actively develop Autodesk® Revit® implementation strategies, techniques, and procedures for architectural and MEP companies. He has worked for TEECOM Design Group, GTE/GTEL, Greg LeDoux and Associates, and Scottish Power in England. Bill is an Autodesk MEP Implementation Certified Expert, and has been the Lead Designer for several multimillion dollar communication sites which have included structural, electrical, HVAC, conduit, cable plans and equipment layouts. He graduated from the Pasadena Institute of Technology and has a Sustainable Design Certification from the University of California at Berkeley.

Get it. Know it. Use it.


July 31, 2015

Revit 2016-Duct Part Editor for Fabrication


Autodesk Revit 2016 uses the Autodesk Fabrication MEP configuration data defined in the current version of Autodesk Fabrication products CADmep, ESTmep, CAMduct.

The Duct Part Editor enables you more detailed control over the duct components and allows you to define detailed dimensions of the part and its connectors.

Place fabrication parts for the selected service. -- Use the MEP Fabrication Parts palette to select a service and place fabrication parts in the drawing area. If no parts are listed in the browser, click Settings to open the Fabrication Settings dialog and load content into the MEP Fabrication Parts palette.


Edit a fabrication part to define the necessary dimensional values and connector settings. -- The Edit Part tool opens the Edit Part dialog. Use this dialog to edit dimensions and connectors for a fabrication part.


...View video below...


For more information on training and consulting for the various products Ideate services, visit our website at www.ideateinc.com


Bill Johnson

Ideate Senior Application Specialist MEP/AEC Solutions

Bill has over 25 years experience in applying MEP & AEC design solutions for large commercial companies, this has led to actively develop Autodesk® Revit® implementation strategies, techniques, and procedures for architectural and MEP companies. He has worked for TEECOM Design Group, GTE/GTEL, Greg LeDoux and Associates, and Scottish Power in England. Bill is an Autodesk MEP Implementation Certified Expert, and has been the Lead Designer for several multimillion dollar communication sites which have included structural, electrical, HVAC, conduit, cable plans and equipment layouts. He graduated from the Pasadena Institute of Technology and has a Sustainable Design Certification from the University of California at Berkeley.

Get it. Know it. Use it.

July 21, 2015

Revit 2016-Autodesk MEP Content For Fabrication


Autodesk Revit 2016 uses the Autodesk Fabrication MEP configuration data defined in the current version of Autodesk Fabrication products CADmep, ESTmep, CAMduct.

Services from the configuration are added to the Revit project and are organized into groups as defined in the Autodesk Fabrication MEP products.

ITM components within the Services are inserted from the Revit MEP Fabrication Part browser.

Fabrication components provide detailed connection definitions, more granular control on fitting definitions, and standardized segment lengths, leading to more accurate lengths, quantities, and coordination.  Modeling with these components in Revit provides detailers in construction firms’ greater certainty that the model accurately reflects the intended installation.

Using the fabrication content on the MEP Fabrication Parts palette, you can add the components by selecting them and using the Smart Snapping tool easily connect to mechanical equipment.


...View video below...


For more information on training and consulting for the various products Ideate services, visit our website at www.ideateinc.com


Bill Johnson

Ideate Senior Application Specialist MEP/AEC Solutions

Bill has over 25 years experience in applying MEP & AEC design solutions for large commercial companies, this has led to actively develop Autodesk® Revit® implementation strategies, techniques, and procedures for architectural and MEP companies. He has worked for TEECOM Design Group, GTE/GTEL, Greg LeDoux and Associates, and Scottish Power in England. Bill is an Autodesk MEP Implementation Certified Expert, and has been the Lead Designer for several multimillion dollar communication sites which have included structural, electrical, HVAC, conduit, cable plans and equipment layouts. He graduated from the Pasadena Institute of Technology and has a Sustainable Design Certification from the University of California at Berkeley.

Get it. Know it. Use it.