
SAN FRANCISCO, CA, 4/28/2015 – Ideate, Inc., Autodesk Developer Network member for more than 20 years – and Autodesk Platinum Value Added Reseller – announced today that Senior Architecture, Engineering and Construction (AEC) Application Specialist and LEED AP Sash Kazeminejad has been named Autodesk Authorized Training Center (ATC) Top Instructor – North America – for 2015.
Sash achieved status as an Autodesk Certified Instructor in 2014. Since then, nearly 170 students have submitted evaluations attesting to his enthusiasm, expertise and effectiveness, resulting in an overall Instructor Performance Quality rating of 99%. This designation identifies him as the top instructor in North America among the 635 active Autodesk-certified instructors.
When asked how he plans to maintain or even improve upon his success as an ATC instructor Sash says, “it’s simple: focus on being an effective teacher and ensuring that students are receiving value. Continue to bring others along in their learning of the tools and techniques. Also, be someone that students trust as an advisor. The goal is to be able to pass on knowledge that goes beyond normal, basic instruction.”
Sash enjoys teaching and learning about the details deep within software. He notes that mastering any software can take years and that he is always learning something new. A natural curiosity, matched with a strong commitment to never take the process for granted or take things at face-value, set him up well to constantly be adding to his own skill set and to effectively help others build theirs'. His enthusiasm for instruction – and his ability to effectively present and diagnose problems – clearly serve him well and set him on the path to this achievement.
Ideate Training Manager, Jennifer Anderson, emphasizes, “People believe in and respond to Sash’s approach because he has the industry experience and the expert knowledge of the software. Students go out of their way to evaluate Sash as an instructor and Sash goes out of his way solicit those evaluations and that feedback. In our training at Ideate, our commitment is to the success of individual students.” Sash Kazeminejad’s recognition as Top ATC Instructor is a testament to that focus.
Ideate President, Bob Palioca says “Sash has significant expertise in AEC applications and important experience in the field of architecture, in particular. His ability to demonstrate and teach sophisticated workflow solutions in a highly relatable and effective way makes him a valued resource to our Autodesk training program and to the Ideate team more broadly. We are delighted for Sash and congratulate him for this accomplishment.”
About Ideate, Inc.
Ideate, Inc. is a leading Autodesk Authorized Developer with 25+ years’ experience in software development and specific focus on Building Information Modeling (BIM). As an Autodesk solutions provider, Ideate has offered quality software, training, support and custom consulting services to the architectural, engineering and construction (AEC) industries since 1992. Headquartered in San Francisco, California and operating Autodesk Authorized Training Centers (ATCs) in California, Oregon and Washington, Ideate is recognized as an Autodesk Platinum Partner for Architecture, Engineering and Construction, one of Autodesk’s highest levels of authorization.
Ideate Software allows Revit users to have unprecedented control over their data. Ideate BIMLink, Ideate Explorer for Revit, and Ideate Sticky were all developed to solve persistent problems in Architecture, Engineering, and Construction (AEC) workflows. Ideate Software solutions enable Revit users to save time, increase accuracy, improve project deliverables, and elevate design.
Autodesk, Autodesk Revit and ATC are registered trademarks or trademarks of Autodesk, Inc., and/or its subsidiaries and/or affiliates in the USA and/or other countries. Microsoft Excel is a registered trademark of Microsoft Corporation in the United States and other countries. All other brand names, product names or trademarks belong to their respective holders.
Showing posts with label AEC Application Specialist. Show all posts
Showing posts with label AEC Application Specialist. Show all posts
April 28, 2015
March 18, 2015
Down Time in Afghanistan
Some of you may know that I am an AEC Application Specialist for Ideate, Inc. as well as a home designer by trade, and an Oregon National Guardsman. When first deployed to Afghanistan the summer of 2014, we were stationed at Shindand Air Base. The days were long and hard, but we did get some down time. A good friend of mine, the Fire Support Officer for the Squadron, was talking about doing a remodel of his kitchen when we return. I told him that I could sketch a few ideas so that he and his wife could review and “dream” of a new kitchen when we returned. In order for me to do this, I needed dimensions and a rough sketch of what their kitchen looked like. Through several emails, pictures, and a lot of descriptions of what I needed without the ability to go there or communicate by phone I had a good idea of what I was working with.

Michael and I sat down and using Revit, I sketched the as-builts in a very short amount of time. The thing Michael enjoyed, was the ability to see his actual kitchen, “pop-up” in a 3D model very quickly. We used these as-builts to ensure the kitchen layout was correct and experiment with various layouts and space arrangements.
The as-builts included generic walls as I couldn’t actually be there to see what they were made of and had to be guessed on based upon standard construction methods. The important details such as interior dimensions were the critical part to ensure that room sizes were correct. I added casework, countertops, and a table to help identify the spaces to Michael, and Heather.
As I wanted to provide Michael and Heather with a few options to think about, I decided to use Revit’s Design Options tool to create several options. I contemplated moving the as-builts to an existing phase, but I did not really have the time to manage phasing, the goal was some quick design ideas through the use of Design Options.
When using Revit’s Design Options, there are two main things to consider. Something known as the Main Model, and the Design Options themselves. The idea behind the “Main Model” is basically, elements within a design that will be consistent throughout all Design Options, are initially drawn prior to creating the Design Options. In my case, the main room walls, sink window, pantry and openings were all created in the Main Model as we were not going to change those. The closet on the south wall was not added to the Main Model as we were going to remove it and would not be in any Design Options.
NOTE: You can always add more things to the “Main Model" after Design Options have been established, but it helps to get the initially consistent things drawn first.
After creating the Main Model, I turned on the Design Options function and named the Design Option Set “Kitchen Remodel." When Design Options are first created, an initial “Option" is available known as the “Primary” Option. I renamed this option “As-Built”. Setting the “As-Built” option current, and added the closet, casework, kitchen equipment and a dining room table.
NOTE: By default the Primary Option is what is displayed in all views (plan, 3D, elevation, schedules, etc.) when not actively working in a Design Option.
 |
| Figure 1 As-Built Kitchen/Dining Room |
 |
| Figure 2 Visibility Graphics to assign a Design Option to a View |
NOTE: The benefit of assigning a design option to a view through Visibility Graphics is that the view is dedicated to seeing the contents of the option. If not assigned, the primary option is displayed in the view when not actively working on a view.
For the main perspective camera view I applied ambient shadows, and the new Revit 2015 Sketchy Lines Graphic Display Option. This gave me a rough sketchy look providing the illusion that the idea was not set in stone. I also created some isometric views and combined the use of transparency and visibility control to generate views to aid Michael and Heather in visualizing what they were looking at. As with the floor plans and camera views, duplicating and assigning the appropriate Design Option to visibility Graphics was repeated. Another benefit of this is that each view can then be added to sheets displaying various options to compare.
 |
| Figure 3 Camera view of one of the options with ambient shadows and sketchy lines |
 |
| Figure 4 Presentation Sheet |
Some things I liked about this process: (1) Easy way to incorporate various options and compare them in a single model. (2) Ambient shadows and sketchy lines for presentations. (3) Ability to control what option is visible per view.
Some things I did not like about the process: (1) When creating an option, if there are elements you would like to use again in another option, The only way to get the elements from one option to another is to use The “Copy to Clipboard” and “Aligned to Same Place” tools from the Modify Tab and Clipboard panel on the Ribbon interface. This is a cumbersome process switching from one design option to another. (2) Although the guide grids in sheets are very helpful, there is no way to snap a corner of an element within a view to a grid line. Zooming in and moving it as close to a grid line as possible is the closest you can come to aligning these views. It is so miniscule you would never see it on a final print however.
I could go on about Design options and there is certainly more things to consider with them, but I have to go assume some First Sergeant Duties. Our replacements got here last night and we are beginning to cross train them in our jobs so I can get back home. For more information on Design Options see ideate Inc. on-line training schedule for the Leveraging Design Options class, or perhaps think about some consulting on the use of options. Take care, “Steel Rain” out.
Visit Ideate Inc. on the web for more information on Revit 2015 and more.

Ideate AEC Application Specialist
Ron has over 24 years of experience in the architectural industry as a drafter, designer, lead project designer, trainer, and a CAD manager implementing Autodesk Architectural Solutions for a residential design firm. His instructional background includes being an Autodesk Certified Instructor, trainer, support technician, educator at Portland and Clackamas Community Colleges, as well as a U.S. Army certified instructor where he was a senior instructor at Ft Lewis Washington. Ron is a member of the Oregon Army National Guard and platoon sergeant, training and mentoring soldiers in their careers. Ron is a published writer and continues to author professional technical training manuals and shorts for AutoCAD, AutoCAD Architecture, and Revit. As an Autodesk Certified Instructor, Ron provides Revit Architecture training and support for AEC firms. Follow Ron @RonPalmaAEC.
Get it. Know it. Use it.


February 20, 2015
Notes from Afghanistan
Hey folks, I have not contributed to the ideate blog for quite some time as I have been deployed to Afghanistan for almost a year. Now that the war is over, and we are wrapping things up, preparing to come home, I finally have some time to write down some things I have been doing to keep my skillset up. As soldiers prepare to come home, mementos of time spent away from home begin to attract soldier’s attention.
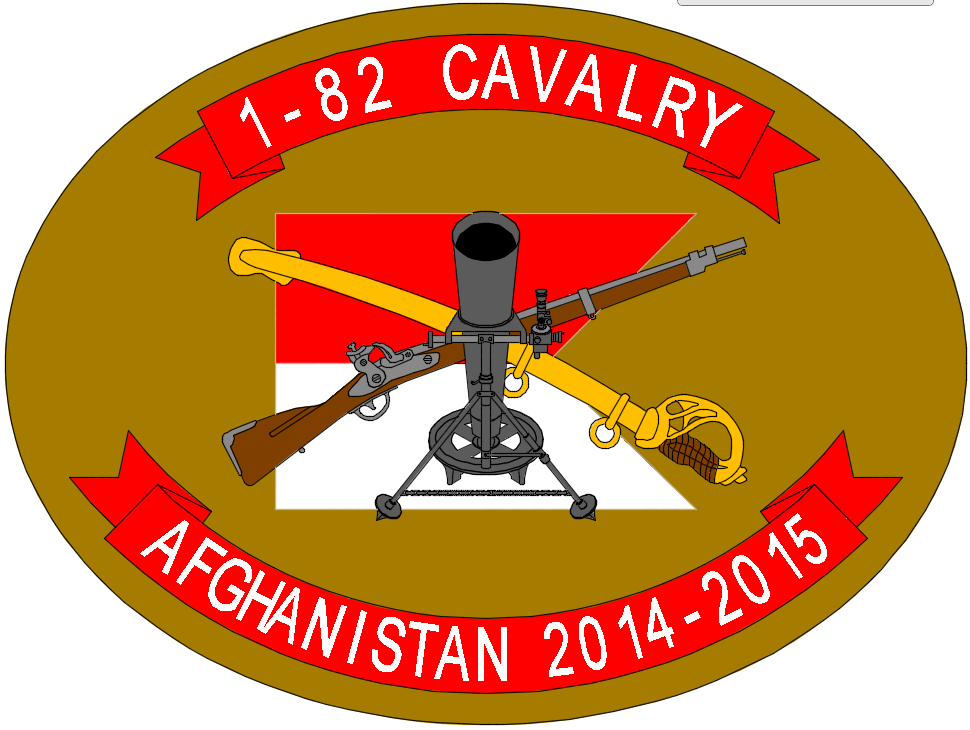
In remembrance of our time spent here across the entire country of Afghanistan I decided to design a logo that I could give to all of my soldiers to remember their time and sacrifices spent here. Velcro Patches seem to be the in-thing amongst our soldiers so I decided to create a patch that represented our Battalion. To do this, I chose AutoCAD 2015 as my artwork in Photoshop is not that great, and I prefer to draw with straight lines and arcs as I have greater control.
The unit I belong to is a Cavalry Squadron, and is comprised of Cavalry Scouts, Infantry Scouts, and Mortarmen, along with support assets. So these three things were crucial in the design. As I am a mortar platoon sergeant, of course the mortar took center stage. I drew a rifle representing the infantry branch and a saber to represent the cavalry branch all over a red and white cavalry guidon representing the 1-82 Cavalry Squadron. Ribbons with the squadrons name and the time spent in Afghanistan also adorn the design against a “coyote brown” background representing Afghanistan. It was very rewarding to actually get this in production. The tailor I used was very pleased with the crispness of the artwork and wanted to know what I used to create the artwork…AutoCAD 2015.
I haven’t really dealt with AutoCAD for quite some time, but was impressed with the new hatching tools in the ribbon. My only frustration, as I am sure many of you have, is finding various tools amongst the ribbons. I found myself typing commands at the Command prompt as it seemed faster to do what I wanted rather than hunting around for the tool. One thing I wish AutoCAD did better was utilizing context sensitive menus like Revit. What I mean here is when accessing various tools, or editing various objects, I wish the ribbons would react to the thing that is being edited. As I used polylines to enhance the width of the various artwork, I was wishing for a ribbon to pop up with related toolsets for the polyline or polylines I had selected to edit. Regardless, AutoCAD is not dead. It still has its best use scenarios, and designing a logo for me was where AutoCAD helped me the most.
I have a few more blogs coming particularly in the Revit realm, where I have used Revit the past few months to help me keep a bit of home close and help pass the time. As we come down to our final days here, I want to thank you for your support as I have been away, thank you for the many veterans and their sacrifices you have gone through, and thank Bob Palioca and the crew at ideate for their support and understanding with me being absent. See you all soon…"Steel Rain”, out.
Visit Ideate Inc. on the web for more information on AutoCAD 2015 and more.
Ideate AEC Application Specialist
Ron has over 24 years of experience in the architectural industry as a drafter, designer, lead project designer, trainer, and a CAD manager implementing Autodesk Architectural Solutions for a residential design firm. His instructional background includes being an Autodesk Certified Instructor, trainer, support technician, educator at Portland and Clackamas Community Colleges, as well as a U.S. Army certified instructor where he was a senior instructor at Ft Lewis Washington. Ron is a member of the Oregon Army National Guard and platoon sergeant, training and mentoring soldiers in their careers. Ron is a published writer and continues to author professional technical training manuals and shorts for AutoCAD, AutoCAD Architecture, and Revit. As an Autodesk Certified Instructor, Ron provides Revit Architecture training and support for AEC firms. Follow Ron @RonPalmaAEC.
Get it. Know it. Use it.
October 1, 2013
Ideate, Inc. Tech Team Member Awarded Autodesk® Certified Instructor (ACI) Designation
SAN FRANCISCO, California, 10/1/2013 - Ideate, Inc., an Autodesk Gold Value Added Reseller, today announced that Ideate AEC Application Specialist Gaurav Bagga was awarded Autodesk Instructor Certification (ACI) upon completion of the three-day ACI Workshop in San Diego, California, August 20 –August 22, 2013. Bagga joins Ideate AEC Application Specialists who have received the ACI designation: James Cowan, Shruti Harve, Matt Miyamoto and Ron Palma.
The ACI program is a cornerstone of the Autodesk Professional Excellence Program. It provides professional instructors with the highest level of training on the use of Autodesk software and gives them globally recognized accreditation. The program requires each candidate to have at least two years’ teaching experience before application and admission. It is designed to ensure that students leave the classroom competent and confident.
ACI certified instructors must meet standardized requirements in order to teach Autodesk solutions. The program also provides an in-depth evaluation of an instructor’s proficiency with Autodesk solutions and the instructor’s ability to train others.
The ACI certification of Gaurav Bagga completes the ACI requirement for Ideate, Inc. from Autodesk for the FY2014 year.
“We offer congratulations to Gaurav on the extraordinary achievement of ACI status,” says Bob Palioca, President of Ideate, Inc. “The rigorous ACI training guides our expert technical team members to advance their already excellent listening, presentation, and teaching skills. The evaluations they undergo–from class members, instructors, and self-directed—encourage even greater refinement of skills and mastery of fast-evolving technologies. Our AEC Application Specialists, with their knowledge, energy and enthusiasm, truly set Ideate apart.”
About Ideate, Inc.
Ideate, Inc. is a leading Autodesk solutions provider, offering quality software, training, support and custom consulting services to AEC professionals. Established in 1992 and headquartered in San Francisco, California, Ideate is recognized as a Gold Partner for Architecture, Engineering and Construction, one of Autodesk’s highest levels of authorization. Ideate, Inc. operates five Autodesk Authorized Training Centers (ATC): San Francisco, Sacramento and San Jose, California; Portland, Oregon; and Seattle, Washington. Ideate facilities are Autodesk Authorized Certification Centers, providing globally recognized certification courses for professionals who sell, service and support Autodesk products and solutions. For more information visit www.ideateinc.com.
Autodesk and ATC are registered trademarks or trademarks of Autodesk, Inc., and/or its subsidiaries and/or affiliates in the USA and/or other countries.
The ACI program is a cornerstone of the Autodesk Professional Excellence Program. It provides professional instructors with the highest level of training on the use of Autodesk software and gives them globally recognized accreditation. The program requires each candidate to have at least two years’ teaching experience before application and admission. It is designed to ensure that students leave the classroom competent and confident.
ACI certified instructors must meet standardized requirements in order to teach Autodesk solutions. The program also provides an in-depth evaluation of an instructor’s proficiency with Autodesk solutions and the instructor’s ability to train others.
The ACI certification of Gaurav Bagga completes the ACI requirement for Ideate, Inc. from Autodesk for the FY2014 year.
“We offer congratulations to Gaurav on the extraordinary achievement of ACI status,” says Bob Palioca, President of Ideate, Inc. “The rigorous ACI training guides our expert technical team members to advance their already excellent listening, presentation, and teaching skills. The evaluations they undergo–from class members, instructors, and self-directed—encourage even greater refinement of skills and mastery of fast-evolving technologies. Our AEC Application Specialists, with their knowledge, energy and enthusiasm, truly set Ideate apart.”
About Ideate, Inc.
Ideate, Inc. is a leading Autodesk solutions provider, offering quality software, training, support and custom consulting services to AEC professionals. Established in 1992 and headquartered in San Francisco, California, Ideate is recognized as a Gold Partner for Architecture, Engineering and Construction, one of Autodesk’s highest levels of authorization. Ideate, Inc. operates five Autodesk Authorized Training Centers (ATC): San Francisco, Sacramento and San Jose, California; Portland, Oregon; and Seattle, Washington. Ideate facilities are Autodesk Authorized Certification Centers, providing globally recognized certification courses for professionals who sell, service and support Autodesk products and solutions. For more information visit www.ideateinc.com.
Autodesk and ATC are registered trademarks or trademarks of Autodesk, Inc., and/or its subsidiaries and/or affiliates in the USA and/or other countries.
###
Subscribe to:
Posts (Atom)